My participation in online stuff was sparse at best,
because again this year I got very sick.
Yeah yeah, I know. Every year. Allergies -> sinus infection ->bronchitis, -> pneumonia. Every. Year.
Warning, mild Medical talk ahead.
But this year was different because I was in so much sinus pain, and so miserable at the idea of another half-year in bed that I wheedled the doctors into doing a CT scan of my head and sinuses. Good thing too, because I had a condition called Silent Sinus Syndrome, which you can't see unless you do a CT scan. It was probably why I have been unable to recover normally from sinus infections, and has been an ongoing condition for years. The cure? A surgery! With multiple parts to solve all the structural problems my sinuses had!
Oh what fun. No, it really wasn't, but modern medicine is wonderful. I'll spare you the details of the surgery and recovery process, but it took a long time to progress through recovery, and I am still on Rx rinses to continue the healing, a month later.
Now what they do not tell you, when they rearrange the inside of your face in 3 different sinus procedures at once, is that bone is exhausting to heal. I'd never broken bone before, so I didn't know this. It really takes it outta you to heal any amount of work done to your bones. Also, I am recovering from over a month spent in bed. So now I am again very gradually increasing the amount of work I am able to do.
All this was very stressful for me on an Executive Functioning level too ( I am autistic, and getting complex tasks of some types done is not my best area) so I had to drop out of school for the semester, and I'll try again next semester. I am now being very, very careful about the levels of stress I subject myself to. I get swamped by stress very easily and I run out of mental energy very easily, (not just "Oooh, I'm all stressed and too tired to concentrate any more", but "ack I can't form sentences anymore or think straight and words are make thingy hand gestures someone drive me home should so home safe think yes please," so I have to take things slowly.
Thursday, November 19, 2015
Wednesday, September 30, 2015
Making Solas- Dragon Age doll.
I am making a doll of a Dragon Age character called Solas, who is a bald elf male.
I am going to make the lovely but happily inexpensive Resinsoul/Bobobie (? could be either honestly I could swear I've seen him on both websites' roster- they are sister companies) Tang into this character.
The Plan:
First, facial mods. I need Tang to resemble Solas more closely. I'll be adding or refining his elf ears, and reshaping parts of his face.
Second, Aesthetics. I want to paint and blush him to look just like the art style of the games.
Third, Outfit. I'm going to make him his basic clothing from the game art, with a few accessories.
***
I ended up going out of order because I am rather ill and not recovering in anything like decent time. *grump* So lying in bed I've had a lot of time for stitching things.
So first, parts of the Outfit!
I'm gonna make a basic outfit based on images from the Dragon Age games. (I should put a pic here of the outfit. Should. Don't have a decent one that isn't someone's cosplay.)
Solas' uber-nerd turtleneck ensemble has this green dickey-collar underlayer, which no one seems to know the true identity of. I am positing it could easily be some kind of vest thing.

So I made a kind of vest thing, out of greeny brown faux leather stuff I had.
I've left the back open and pretty untailored so that when the doll arrived I could fit it to him better.
Then I worked on the cream sweater thing itself.
 Here you see my messy lap-table drawing board, which I use when I craft
while sitting in bed. (You'd be amazed how often I have to do that. Er, I
can explain! I've been sick a lot the last few years, and have worked
out this method as a survival strategy for not going stark raving
bored.)
Here you see my messy lap-table drawing board, which I use when I craft
while sitting in bed. (You'd be amazed how often I have to do that. Er, I
can explain! I've been sick a lot the last few years, and have worked
out this method as a survival strategy for not going stark raving
bored.)

It has this collar edging which is unbelievably finicky to do at this scale.
I made the whole collar part as a separate piece that I then attached.
 Again the thing is open up the back so I can adjust it to fit around the
body when I have it in hand.
Again the thing is open up the back so I can adjust it to fit around the
body when I have it in hand.
Ta-da!

Then guess who decided to turn up today? I had to scramble to get decently dressed enough to get to the door before the mailman could walk away thinking I wasn't home. (Oh, like you sit sick all day in bed wearing a fully presentable outfit. Don't judge me.)
 The outfit needs a little work to fit him better, but not bad given that
I sewed it without him present. Definitely gonna take up those sleeves
for one thing.
The outfit needs a little work to fit him better, but not bad given that
I sewed it without him present. Definitely gonna take up those sleeves
for one thing.

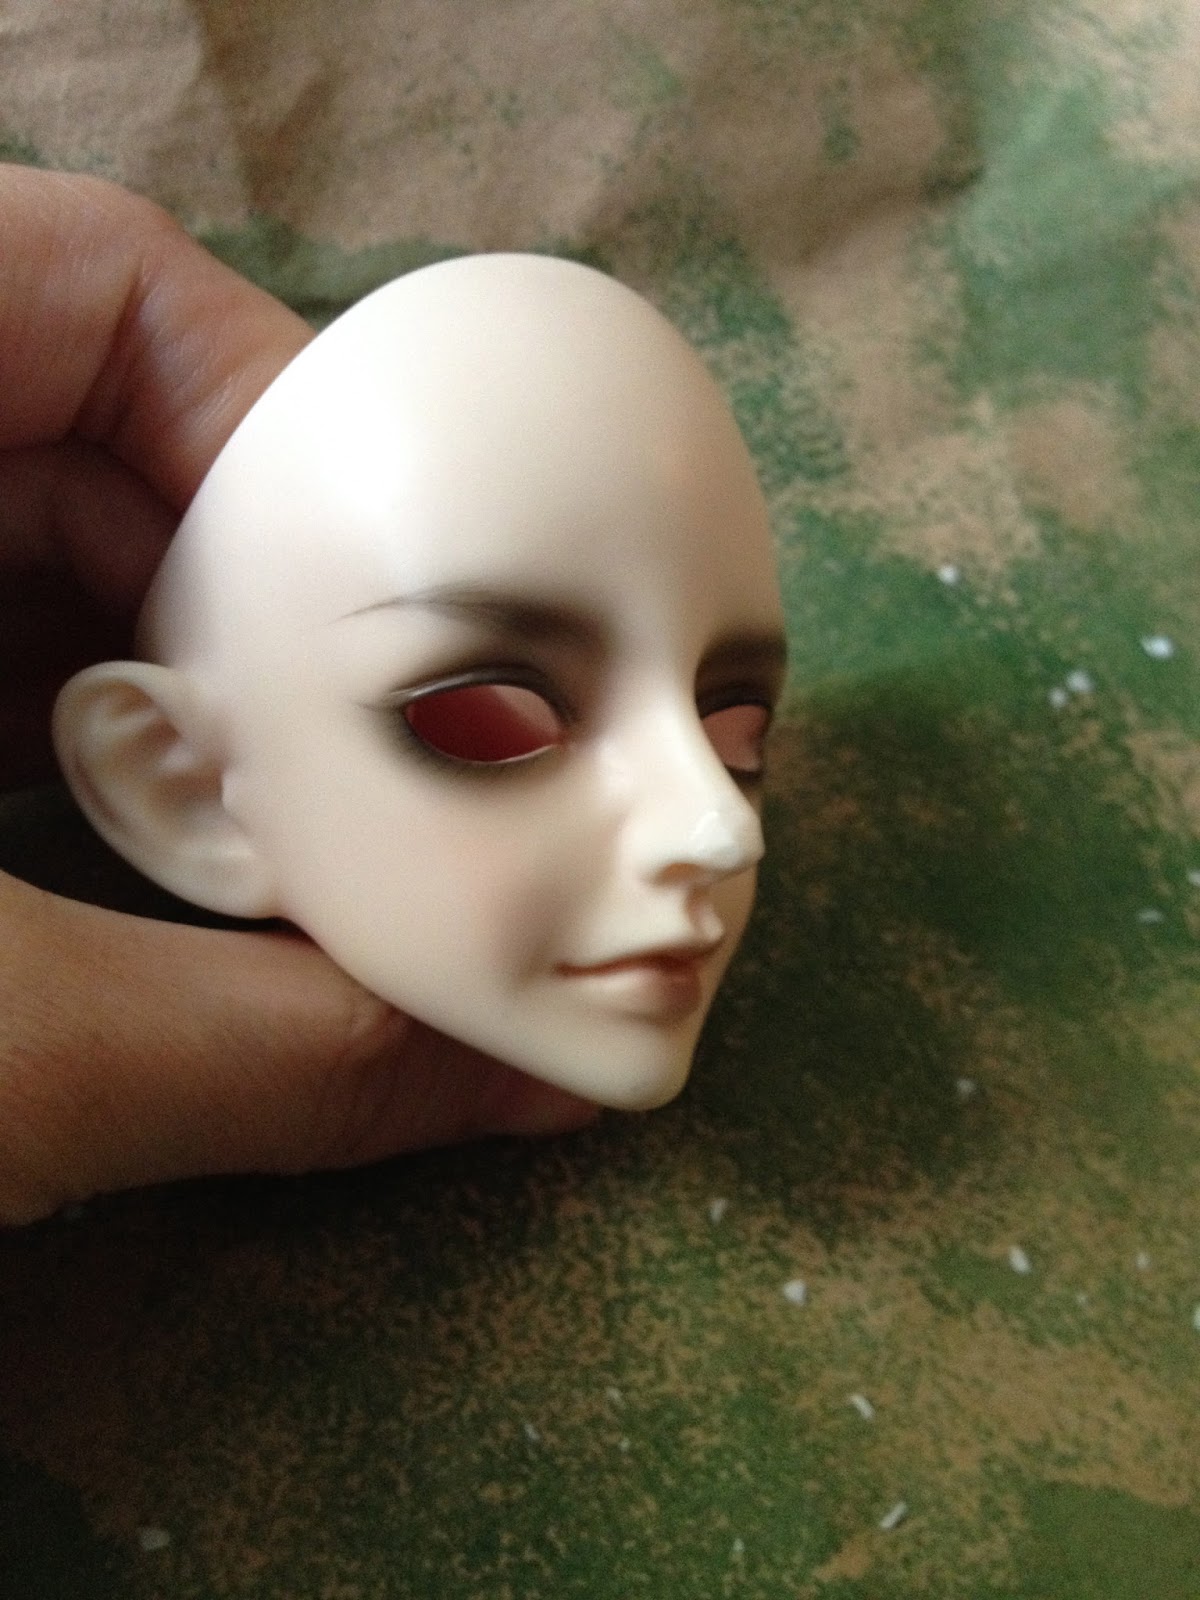
Oh that face. Uff. Not a strong resemblance at all. The eyes will need to be smaller, the jaw longer and wider, the ears modded.

I really, really wish RS/BBB would take a hint from other doll companies and show more than one highly-obscured-by-huge-wig shot of the doll's face. I had no idea his nose would be so slim and pointy, and he has an overbite like a looming tax audit.(it hangs overhead?) Welp, that's what the Dremel is for, after all.
The plan at the moment is to modify the heck out of his head, then spray paint it white and blush it back to matching. That took me two or three days last time I did it to a doll, because first the Apoxie modding has to cure before you sand and paint, and then the paint has to cure before you seal and and blush.
 I started on his nose first.
 Then I did some work giving him a jawline and filling up those giant eyes. It always looks awful when it's this rough.

 Then I started refining the work. Filling in the eyes will be tricky. I had to stop working because I am sick and my hands shake. I'm going to try doing a little more smoothing out today.
I am going to make the lovely but happily inexpensive Resinsoul/Bobobie (? could be either honestly I could swear I've seen him on both websites' roster- they are sister companies) Tang into this character.
The Plan:
First, facial mods. I need Tang to resemble Solas more closely. I'll be adding or refining his elf ears, and reshaping parts of his face.
Second, Aesthetics. I want to paint and blush him to look just like the art style of the games.
Third, Outfit. I'm going to make him his basic clothing from the game art, with a few accessories.
***
I ended up going out of order because I am rather ill and not recovering in anything like decent time. *grump* So lying in bed I've had a lot of time for stitching things.
So first, parts of the Outfit!
I'm gonna make a basic outfit based on images from the Dragon Age games. (I should put a pic here of the outfit. Should. Don't have a decent one that isn't someone's cosplay.)
Solas' uber-nerd turtleneck ensemble has this green dickey-collar underlayer, which no one seems to know the true identity of. I am positing it could easily be some kind of vest thing.

So I made a kind of vest thing, out of greeny brown faux leather stuff I had.
I've left the back open and pretty untailored so that when the doll arrived I could fit it to him better.
Then I worked on the cream sweater thing itself.


It has this collar edging which is unbelievably finicky to do at this scale.
I made the whole collar part as a separate piece that I then attached.

Ta-da!

Then guess who decided to turn up today? I had to scramble to get decently dressed enough to get to the door before the mailman could walk away thinking I wasn't home. (Oh, like you sit sick all day in bed wearing a fully presentable outfit. Don't judge me.)


Oh that face. Uff. Not a strong resemblance at all. The eyes will need to be smaller, the jaw longer and wider, the ears modded.

I really, really wish RS/BBB would take a hint from other doll companies and show more than one highly-obscured-by-huge-wig shot of the doll's face. I had no idea his nose would be so slim and pointy, and he has an overbite like a looming tax audit.(it hangs overhead?) Welp, that's what the Dremel is for, after all.
The plan at the moment is to modify the heck out of his head, then spray paint it white and blush it back to matching. That took me two or three days last time I did it to a doll, because first the Apoxie modding has to cure before you sand and paint, and then the paint has to cure before you seal and and blush.


Saturday, September 26, 2015
Standard Sewing Measurements for BJD- a work in progress
What if I compiled measurements based on all the doll bodies I could get my lil' hands on, in cm, based on this standardizing method for measuring?
Minimum for Male/curveless/bustless dolls
1. Shoulder to shoulder
2. Neck base to shoulder
3. Neck
10. High Bust or underarm
13. Shoulder to waist.
15. Back neck to waist
16.17. Arm measurements
18. Total arm
19. wrist
21. Spread hand, whichever is largest
22. hips at "modern pants" height
23. Hips around butt
25. Waist to hipline
26,27,28. Crotch front, back and total
29. Thigh
31. waist to ankle
33. inseam
and over his foot at the heel at the widest part, since that's what pants have to fit over
And all 30 odd bits of info for female dolls.
I could do it every time I sew for one of them, just take the notes and add it to a small database. I think I'll just start with a list of my own dolls, maybe in the Pages section...It'd be good for my own reference.
Tuesday, September 15, 2015
Amadi gets Aesthetics
Remember my Simply Divine Harlequin, cast for me in Cinnamon? I showed you pics when he arrived, and I put him onto a Pale Tan Dollstown 18 male body. The combo is beautiful. Such amazing artistry in both sculpts and the styles complement each other perfectly!
So I finally found some days in late summer that weren't humid...Sort of. The American Rockies are really dry year round, but get thunderstorms out of nowhere in the afternoons of August. Humidity can really ruin your day when you're spraying aerosols, especially any kind of sealant. It can really cause problems working on Tan resin, because if humidity causes the sealant to lighten at all, it shows up amazingly well against the darker color of the resin.
The first time I tried to seal the body for blushing, I was using Citadel Purity Seal, and I did not know that outside my shop, a humid front was moving in ahead of some clouds while I worked. Rocky Mountain storms are notorious for stealing a march on you. They can come out of nowhere in less than a couple of hours. I am a Native Californian, and still not used to this! You'd think living here in the Rockies for four, almost five years now would have taught me to never trust the radically changeable weather. I need to check outside every hour or so when I work with Sealants in the Rockies. I know this now. I learned it the hard way when the Citadel clouded up on me. It looked like powdered sugar sprayed across the resin. I ended up having to scrub it off the resin.
That took me the help of another doll-hobbyist, many ounces of Windsor-Newton Brush Cleaner, and several DAYS of hard, hard scrubbing. Citadel does not let go in a hurry. Be warned. Ugh. It does Not like humidity At All, and will not be removed without a fight.
So when I came back to try sealing this doll again, I brought back my old favorite, Testor's Model Master Flat lacquer. It's comparatively cheap, it comes in adorable little bitty cans, it was the first faceup sealant I ever used, and it hasn't failed me yet! It also seems to tolerate a smidgen of humidity better than Citadel did, 'cuz I used to use this stuff in a coastal California town, and it has to be practically raining outside for humidity to affect it.
After a wall of text like that, you didn't think I'd leave you without pics, did you? Here he is!


Shtuff gets DONE When I Get Bored
Because I have nothing else to doooooooooo!
I am sick in bed. I do not take this well.
Not even after years of experiencing it many times, sometimes for weeks or months at a time. I am not good at being stuck in one spot. I have so much stuff to do, and I can't do any of it because I am too sick and tired and achey to sit up unsupported for very long and certainly should stay wrapped up warm in bed.
Poop.
SO,
I've been staying busy by blogging, reading and handling business email stuff like an adult look at me adulting all over, and then I started doing bits of hand sewing.
I ended up making Chioma's entire outfit except her coat and boots. Her little top needs a touch more work ( I don't have the right colors of thread, of course. See, that's amusing because I have a stash of thread like Knitting People have yarn stashes or Magic Card Game people have Magic Card decks. I have over 40 reels of threads in about 4 or 5 different kinds of thread. Just not the ones I need. Ever.) ...but it's more or less done. I even made a headband for her wig, and a bit of jewelry.

Chioma is a Chibi Unoa B Grade Roron on the Hannari body. She's going to be dyed a dark brown, ignore her ghostliness for now.
Sunday, September 13, 2015
Aneirin- Saint to Monster, part VI
Part 5
Part 4
Part 3
Part 2
Part 1
Well, it's been a long haul, and the most intensive modification I've ever done, but he's pretty much finished.


Here he is all finished up and wearing his little raggedy kilt wrap. People on Den of Angels commented that he looks confused about being indoors. he does look quite baffled by walls and carpet, when his preferred home is a forest. I can't wait to get him outdoors for some photoshoots.
Thanks for following along! I really appreciate everyone who's been following this whole long escapade!
Thursday, August 13, 2015
Cerra Canna Ceramic Knives- What and Why?

Cerra Canna ceramic knives are very different from an Exacto, in that besides being made of ceramic, they are incredibly hard to cut yourself with! Don't get me wrong, I love my Exacto knives but they do not harbor similar feelings for me or my thumbs. Owch. I love my ceramic knife set. The "blade" is really about as thick as a coin, and it's the cornery edge of that thick blade that is the actual scraping and carving edge. They come in a few shapes, and I'd recommend getting at least the one straight flat one.
I know it's $31.00 for a simple hand tool, but honestly, I'd hand over my Dremel before I gave up this little thingy right here.
When you carve with a ceramic knife, it's a lot like peeling a vegetable. You kind of scrape with it and smooth the little bevels each stroke causes, and it's a good way to remove mass without making too much flying dusty mess. You still have to wear a HEPA-rated mask and clean up your dust carefully, but it's way easier to clean up when it's not a fine powder all over everything in the room.
You don't have to be a serious drastic Modder to benefit from one of these, either. This scraping method of carving is very good for smoothing seams you intend to sand. (Shown Above) It can help you get the rough part of the seam off before you start smoothing it out and finishing it with high grit sandpaper.
Subscribe to:
Posts (Atom)