- Launch the Shop!
- Finish making Aspen, my Wol dryad on a Doll Chateau body, and Shade, my dark starry art doll.
- Do lots more photoshoots. The Shop may kind of force me to do that.
-whip up a batch of petal pink dye and finally just gradient dye the tips of most of my dolls' fingers so their darn blushing will quit just wearing off the hands.
- Finish "Project Noggin" and get resin duplicates made. Probably by Haru Casting, they seem to be wonderful. It's a secret, you will see... Stay tuned!
-Give Lir, Donovan and Kitso the Hob their makeovers. Kevya too. My
dolls have been neglected and I want to give them better faceups and new hardcap wigs. Lir hasn't had work done since 2009!
-keep making tunics and shoes. lots and lots of shoes. Possibly dabble is a few fancy fullsets, props and furniture pieces, but the demand is for fantasy basics and shoes!
Showing posts with label dyeing. Show all posts
Showing posts with label dyeing. Show all posts
Wednesday, February 22, 2017
Sunday, January 3, 2016
PSA- why you NEED a proper respirator when spraying Sealants or paints.
Dear friends, Let me show you guys why respirators are VITAL no matter what you are spraying.
I have a shop where I do my spraying work. It has a filter and a fan that sucks the air out of the spray chamber, filtering as it goes.

This is a few sprays of a paint onto some doll parts. You see that square in the wall? That is the filter. It was white when I started this. That is what was pulled out of the air while I sprayed, the can was never aimed at the filter.
That's what ends up in your lungs when you inhale aerosols. it just shows up here because I was using a paint which has a strong color.
Please, PLEASE use a properly fitted and rated respirator. You only get one set of lungs.
Monday, July 6, 2015
How I Dye Resin: Part 2- Natural Skin Tones
When using Liquid Rit dye to dye resin, getting a natural skin color depends on 3 things-
1. what color is the resin you are trying to dye?
2. What color are you trying to get it to be?
3. How good are you at color theory re: mixing pigments and tints, especially as regards natural skin tones?
Those all affect how well you are able to make a skin tone change color. For example, with one doll I dyed, the starting skin tone was a greenish yellow. Reds cancel out greens, but red is a very strong pigment and a little goes a long way, so I was using a Petal Pink instead of full strength red. A drop or two of an orange also went into this to lift the sickly yellow tones to a more peachy color.
This Den of Angels tutorial is great for de-zombifying or unyellowing yellowed NS dolls.
If, however, your resin starting color is White, any color you mix the dyes to will be what you get. Natural skin tones for humans range from purplish-blue-browny-black, to mahogany, to golden sand, to terra cotta, to reddish peach, to nearly ivory. There's a full rainbow of skin tones possible, and your ability to blend colors to reach a specific tone will be the main factor in obtaining the color you want.
Some knowledge of how transparent pigment dyes behave versus paint is vital. Dye is not paint- it will not blend the same, but it's similar. Reds go a lonnng way, and so do oranges. Tan dyes are usually yellowy and will give you a human tan that is very golden, and require an addition of red or pink to create more warm reddish-tan tones. Browns often have a purpleish tone in them.
Test your color mixes by dipping a white cloth scrap in to see what color you're getting. Document ratios and amounts so you can duplicate particular dye blends.
Also, here's my method for getting a streak free result when dyeing resin.
Friday, June 27, 2014
How I Dye Resin
My process for dyeing dolly parts: Prep is everything!
This isn't exactly instructions, but if you've been doing dyeing and it's not working, this is what I do.
Sand: To dye resin smoothly, use a stupidly high grit wet-sandpaper and an N95 or higher rated mask for you, and sand the part thoroughly to really smooth it out a little. (Don't let the dust get anywhere. It must not be inhaled by anything with fleshy lungs, so do this bit outside and make sure you clean up! Use water to keep the dust contained, then dispose of it carefully.)
Scrub: Then scrub the part with a Magic Eraser or melamine sponge equivalent. Then wash it with a drop of clear dish soap and water, making absolutely sure to get any oils from your fingers off it. After that, handle it only by the back and edges.
Dip: Put a bit of string or wire in a loop through the hole/s in the part to dip it into your dyepot. Make sure the string is long enough so the rising steam from the boiling dye doesn't hurt your hands. Use a small pot that isn't enameled, teflon-coated or aluminum; steel is best. Do this somewhere with daylight lighting so you can compare the part to the resin you're trying to match. If you're doing a whole doll in one color, start with an easy-to-clean part like a forearm, get it the shade you want, then match each part afterward to that. I like to open all my kitchen windows to get proper light for seeing color by. Bring water to simmering boil, add dye, stir with a cheap wooden spoon, not a metal one. It has to be boiling, but a rolling boil is too hot. Then you can dip the part in. Make notes of the precise amounts of dye you use, and the amount of water you started the pot with. You may need this info later.
Match: Go slowly- you can always add more color but taking color away is really, really annoying. Rinse the part in warm water to see what color you've actually gotten to, and to remove any excess dye.
Smoothing: Check it as you get close to the color you want, and if it's blotchy, take it out, scrub blotchy areas with magic eraser. Re-dip it again. Repeat as needed until you get the color you want. Rinse, allow to dry well and totally before using MSC to seal. If it isn't bone dry, the MSC will cloud.
Fin!
Troubleshooting:
"My first part has the wrong color/ is dyed too dark!" - Scrub it clean with a Magic Eraser and some WinsorNewton Brush Cleaner, and wash it with the dish soap again, rise totally clean of soap, then try again.
"My Tan dye is dyeing the doll blue!" (Or other unexpected color)- The chemistry has gone wrong. It's possible your pot has a coating, or is made of aluminum, or sometimes you can even just get a bad bottle of Rit. Scrub the part and try again, with some changes accordingly.
"My dyed doll has darker streaks on the sides of their parts, like where seam lines go." - Yep, that's where seams were. This is the nature of dolls cast in resin, and can't be totally gotten rid of. If the streaks are really dark, see the Smoothing step, and try that, but they won't be totally invisible on some dolls no matter what you do. Blushing can help.
"My doll has streaky spots..." - Do the Smoothing step over again, possibly including a bit of scrubbing with WN on the part where streaks are. residue of old sealant, finger oils or WN must all be scrubbed off then washed carefully off. Clean resin streaks much less.
"When I wiped a faceup attempt off my dyed doll, the dye color got lighter." - Yes, this can happen, as you tend to remove some dye with the faceup. This is why we made the notes about the dye and water mix we dyed it with. You can just replicate your dye recipe, wash your head/face really well, and re-dye it, or you can just blush the new faceup to account for lost color. The same goes for Body Blushing.
Monday, January 27, 2014

Wednesday, July 13, 2011
About Copernica

( Click on the "About" Label for more of my characters and info about the dolls that portray them! )
This is Copernica.
I did her aesthetic design, but she kind of made herself. It all just... happened.
It all started with a Doll In Mind Secret head I was keeping around for some reason. I received it for free, if I recall correctly, because the "Secret" head was a free gift given as part of an event done by Doll In Mind, a doll company in Korea. I liked the sculpt, but all my bigger "SD"- sized dolls have made themselves a realistic group, and the Secret head was just too childlike and stylized... but the perfect, heavy white resin and beautiful sculpture was so lovely I couldn't bring myself to sell her.
Then I was dyeing another doll, and sanding his head to re-dye for even tones, and I looked at the way the dye appeared, half sanded off, as if it were worn away, like antique pottery or ivory or bone...
I set him down, ran upstairs, seized the DIM head and dunked it into the dye, then sanded like a mad thing. I knew all of a sudden what she had to become, exactly how she should be.
Here she is in her beginning.

I went to a local yarn shop and hunted for a good hour to find the perfect thing to make her wig from. I knew it had to be soft, huggable, touchable, and preferably resemble hair or dredlocks. I knew this stuff would be perfect:

I sewed a wig cap out of felt and stitched locks of the yarn to the wig cap.

Some are stitched on the inside so that her wigcap won't show when the hair is pulled back from her face.

Here she is wearing the wig; little moonface. I thought Copernica would be a whimsical name, and now I can't think of her as anything else.
Next: her faceup, or lack thereof, placing her very special eyes, and modding her hands and body.
***

I gave her glass cabochons in 16mm for eyes. I got them from a jewelry supplier.
***
We have a body! A kind soul sold me a body for a great price, and it was in great condition, though being a Domuya Flexi body it needed some work on the stringing channels, some tightening and some sueding. She was comically floppy, which was nice to hug but tricky to pose.

I also made her a little smock to wear until I had finished her mods and could make her more fitted clothing. She liked the embroidery, I think. Here she is finally looking like a proper doll!
She hopes you'll pardon her showing up in her nightie.
Nude shot! Dolly Nudity, nothing explicit.
.
.
.
.

This body was obviously much too mature for her, and there are things about the shapes of the torso I wasn't too fond of, so I reshaped her, and her neck was juuuuuust a touch too short, so she got some Apoxie on the neck top to help how her head sits.
Here's how she looked after those mods-

I took the body apart, reshaped the breasts to be smaller and higher, recut all the stringing channels to be wider, replaced the hand wire bits posing as s-hooks with actual hooks, replaced the failing lanyard hooks inside her feet with new twisted wire parts, and sanded some of her larger sharper seams.
Then, with her still in pieces, I dyed the entire body in Rit dye on my kitchen stovetop. She's uneven, but I wanted her to look a little rough, and somewhat wooden. The colors I mixed gave me a nice rich mahogany or cherrywood color. It photographs very orange but is more wooden looking in person. The thing about her legs is a doll stand to help her remain upright, since she gets played with and moved about so often that her elastic doesn't stay very tight for long.
I got her some White Skinned hands. I ordered them from LUTS. They're Delf boy hands but I've always loved their sculpting and the female hands were too small and delicate for her.
I dyed these hands as close as I could get to the colors I've used on the rest of her, then strapped on my respirator and went into the garage for some sanding work.

Here's before and after shots of the hands, dyed and sanded.

Here's both hands sanded and on her wrists!
And here is the result!

This body is insanely posable and natural, able to sink into poses my other dolls can't even try.

She's one of my favorites in the collection, even if she doesn't "match" with any of them. She's her own little creature.
Sunday, June 26, 2011
Corn is No Place For a Mighty Warrior
So right now my studio is halfway unpacked from moving, thanks to the fabulousness of a best friend. Since I'm not done setting up again, doll mods are slow at the moment but are at least faster than they have previously been the last four months.
I'm working on a Fairyland Pukipuki/Realpuki hybrid, giving him the sturdier body of a pukipuki but the elfin face of a Realpuki Soso sleeping faceplate. He's going to be Apple's beau and eventual husband.
So far he's had his headback adjusted to take the Realpuki faceplate, dyed a mahogany tan, and now given a teeny tiny faceup made possible by Acrylic thinner and a new paintbrush I have that lets me make ridiculously tiny lines.
Here he is, in all his tiny nude glory:
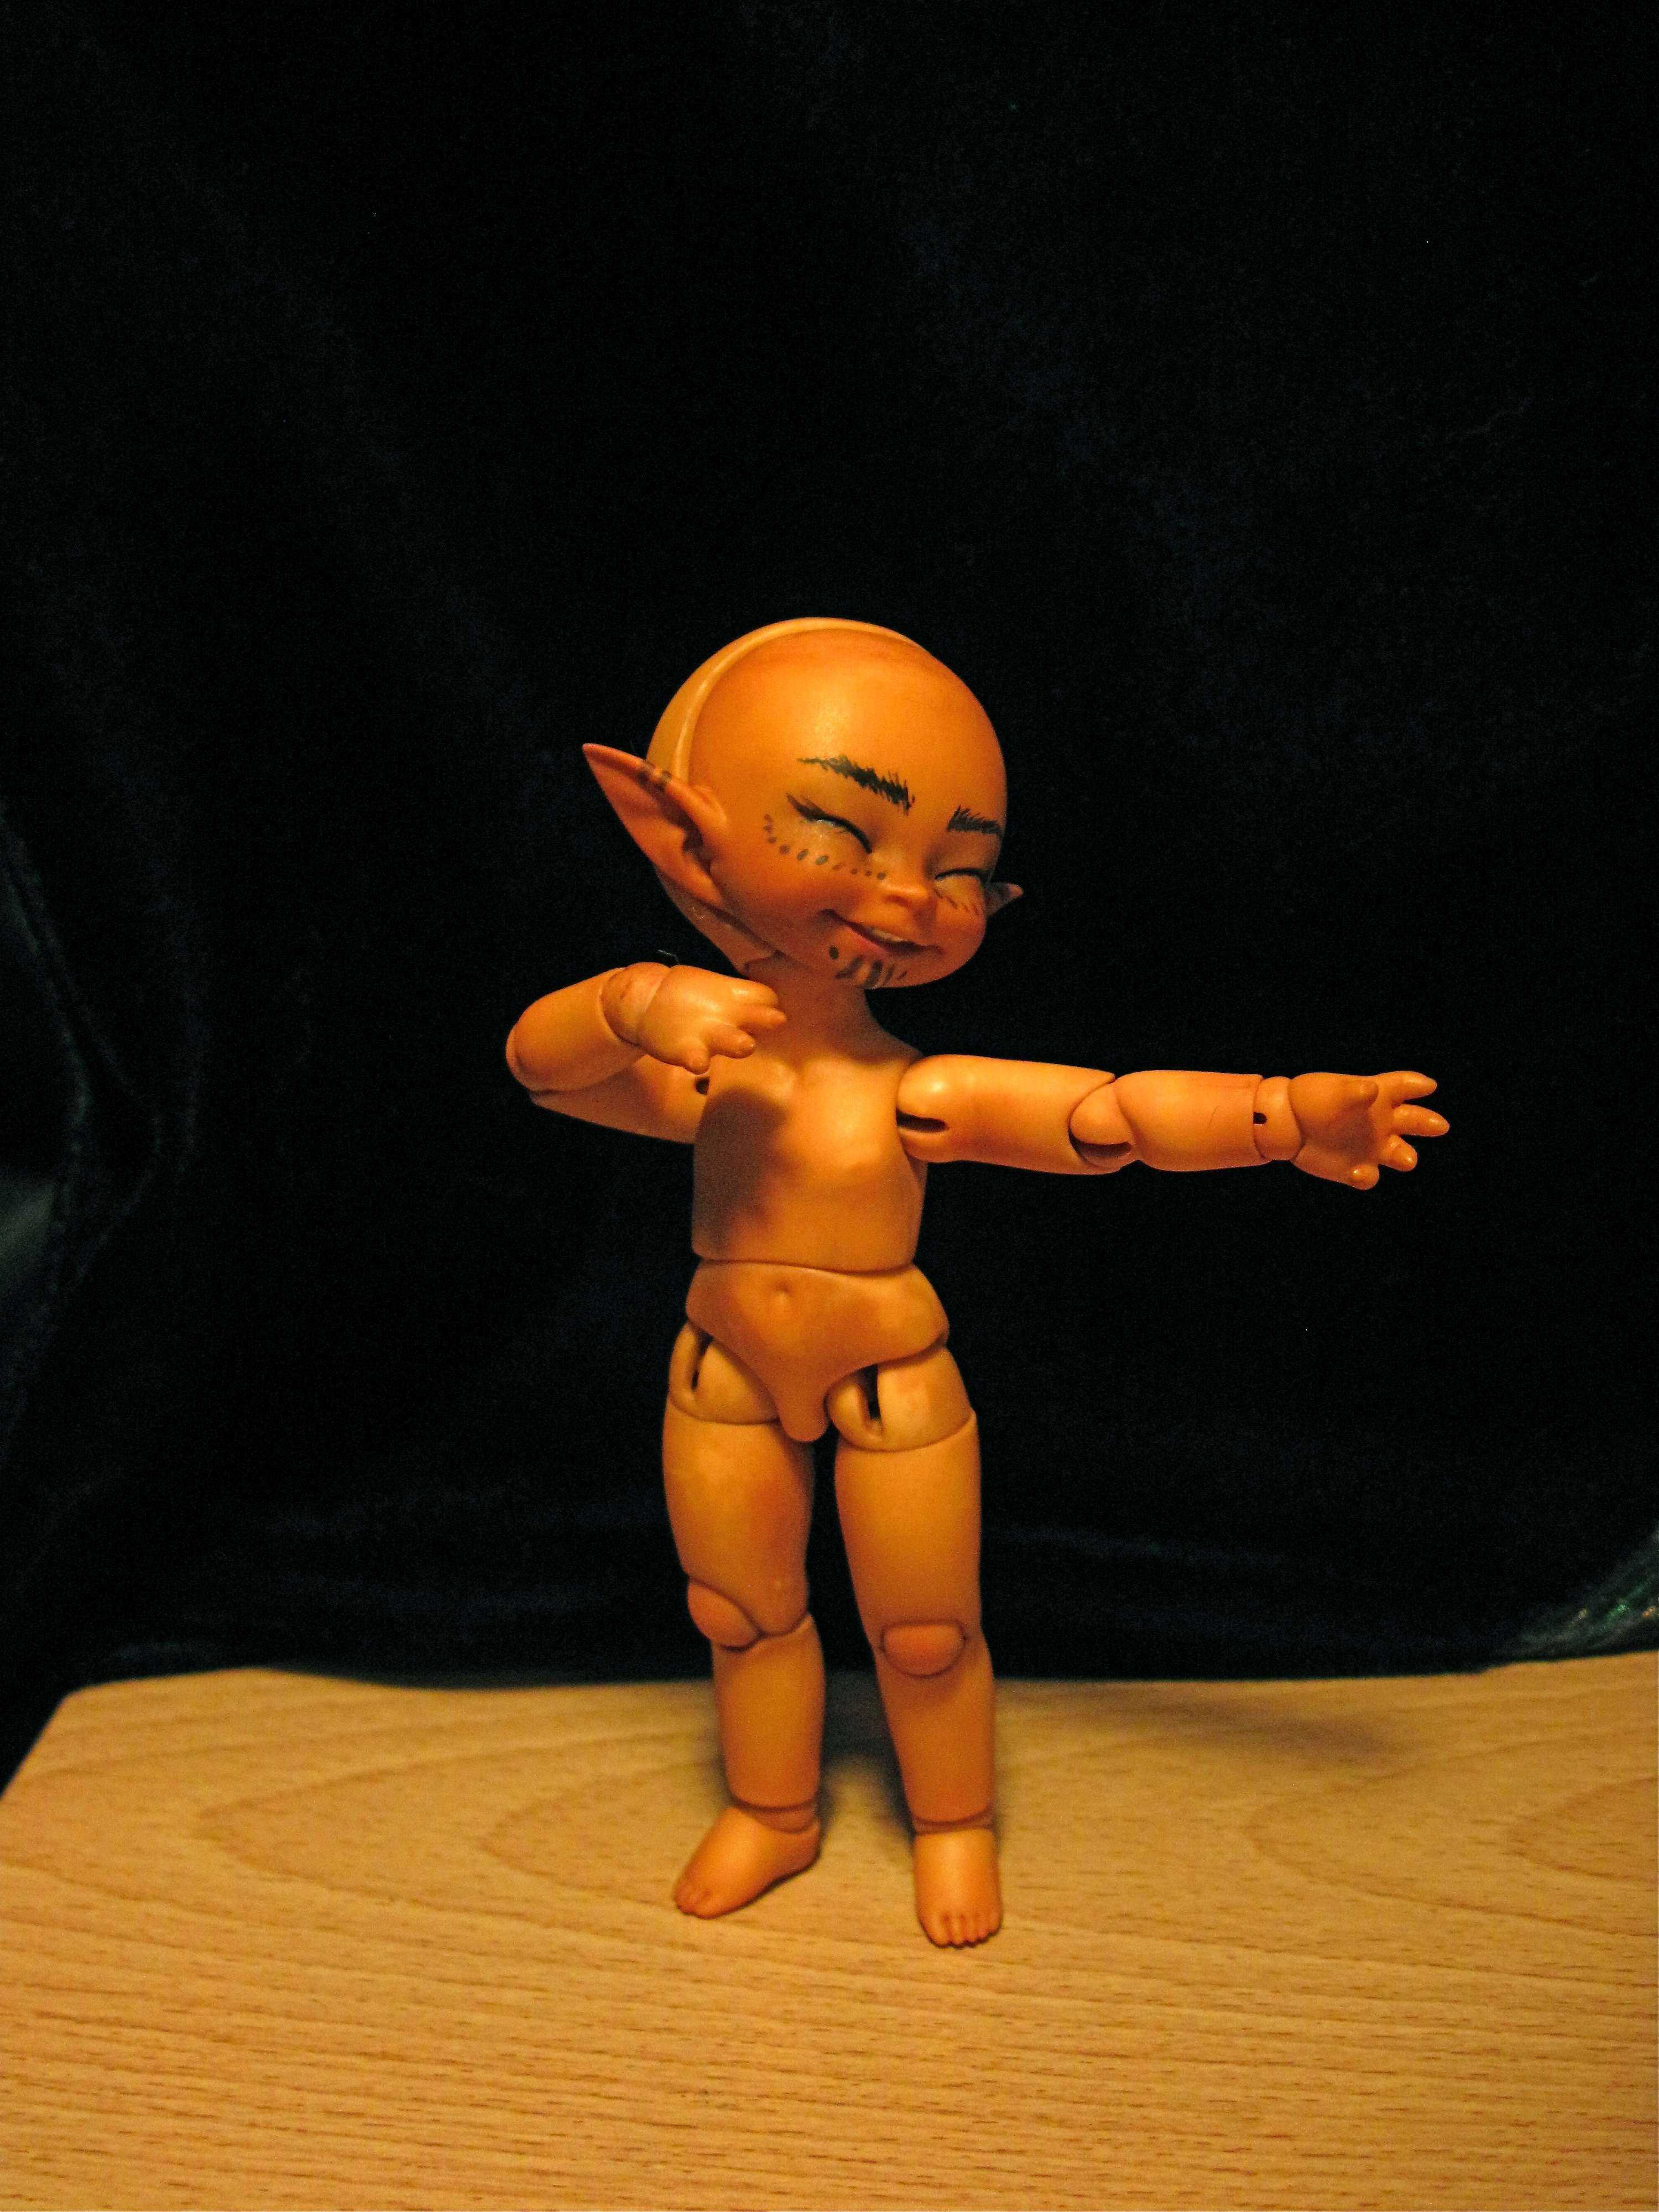
Now that he has a face proper, I can't help but think I've made a mistake. I've been calling him Sorrel up until this point, reasoning that Apple had a floral name so he should too. Sorrel is just not the kind of name a tribal-looking little hunter and warrior should have. He seems much more joyful and fierce. Especially fierce. Sorrel is no name for a mighty warrior. I must find him a new name.
Subscribe to:
Posts (Atom)