My apologies to anyone who reads my stuff on Den of Angels, but a lot of this blog will overlap a bit with those posts. The most info ends up here, though, and is easier to Search.
This is the clothing post for Moira, my modded Minifee Muscle Girl.
She is a Fairyland Minifee Mirwen sculpt, on a previously Male Minifee body and she's meant to be part of a
Medieval-Fantasy setting, and both of those facts mean I have to make
her clothes myself.
I started with her daily clothes. I try to give each of my dolls one
Everyday outfit with accessories, and then some of them get a Formal
Outfit, or an Armor set, or sometimes both.
I made her some underwear, a bra-like top, and some cropped short trousers.
The bra is cotton from a gunnysack towel of the kind I buy for doll
clothes. It has a nice texture but is thin and light. The bra has snaps
in the back for ease of changing, but she'll probably keep it on all the
time under shirts.
I did make her some matching medieval braes, or underpants, which look
like little shorts with a drawstring. Those, however, are for shots of
her getting dressed or going swimming. Layering clothing is actually
kind of impractical on a doll, so she is not wearing the underpants in
any of the following pictures. Viewers of photos will assume she is
wearing them, but having her actually layer them under the trousers
would add too much bulk. I often "cheat" like this with my dolls'
costuming, where layers are concerned.
The trousers are some kind of poly velveteeny stuff I had around, and
they fasten at the fly with a false button sewn on over a functional
snap. (No way am I buttoning pants that tiny, or sewing real buttonholes
at that size!)
Shoes! These are often called Ghillie Brogues or "bog" shoes, and are a very
simple shoe of a type worn in many parts of Northwestern Europe, from
the early Dark Ages all the way into the mid- and even late- Medieval
period.
I wear a similar pair when I do reenactment, so it only took a few
attempts to make a version this tiny for Moira, out of thin or garment
weight leather.
Her tunic is made of some cotton I had that looks like linen with its
slubby large weave. I hand-sewed it, which gave me the chance to do a
thorough job finishing the seams and adding some details like the
decorative stitching down the sleeves.
It doesn't open down the back, because the keyhole neckline and the
Minifee lock at the neck mean I can pop her head off and then easily
slide this tunic on. It has 3/4 sleeves and flat felled seams, and a lot
of stitching around the neckline to let it handle being played with and
not fall apart.
The "belt" is just some cotton cording I had around.
I was messing around with my stash of thin leather and decided to make
her some boots. They slide on and then are fastened by the tie at the
top of each boot. These will be part of her armored outfit later. Her
red trousers come down to the boot tops except when she is sitting. I
will need to make her some other trousers for the armored outfit to
avoid that, I think.
I also made her a belt pouch and a warm weather cloak, though it isn't finished yet.
Here's the whole ensemble so far. The belt pouch is more of the thin
leather, with an acorn shape and a button and string closure.
The cloak is a reincarnation of a poly-cotton shirt I used to love,
which had this lovely chain stitch embroidery all around the hem. I
pleated it around the neckline, and I mean to add some kind of closure
at the collar if I can just figure out what kind of closure I
want to use, and how I want it to look. I could use metal findings, or a
string closure, or put buttons on either side of the collar for a cord
to wrap around or a strap to be buttoned through....
Apologies for the fuzzy quality of these pictures. It's hard to get out
my nice camera when I am excited about what I am working on so these
kind of shots tend to get done with a phone, in poor light.
My health has been iffy lately so I have a
lot of time lying around in bed/ sitting about on my bed. I managed the
other day to do a bit of sewing.
Close up shot: While out on a rare clothes-shopping trip, I
found a clearance-priced sweater made of a loopy cotton blend knit,with
some kind of foil screened onto it. This exactly like a tiny version of
a stuff that gets used for budget chain armor in film and TV. I knew I
had to use it for some mail for my dollies!
I
sewed some of the fabric into an MSD sized hauberk, or "chain-mail"
shirt, with the back open to slip on easily and the front split for
riding, but I didn't want the edges to stretch and distort, so I
stitched around them. To hide the stitches, I used that cotton swab
there to dab silver paint onto the black thread I used. The open back of
the shirt will get little jump rings sewn on so it can be laced up.
(Extra
info: In human scale, if you don't have a lace up back to your mail
shirt, you have to do some really idiotic wiggling to get out of one.
That's why they always show heroes shucking ON their mail, but you never
see a hero in a film taking his mail OFF.
You have to hike the skirt of
the shirt up around your middle, then bend over from the waist, aim
your head and arms at the ground, and then wiggle and wriggle until the
mail slides off, and hope your hair stays under your arming cap
because if the mail gets caught in it, you have to rip or cut your hair
free.
It is polite in reenactment to either look away from a fighter
trying to take off their mail and preserve their dignity a bit, or if
you know them, you offer to help. If you know them really well, you hang around to watch and mock them shamelessly, since they can't come after you with mail over their head!)
Here's
the lousy phone pic of the full effect of the hauberk. The seams I had
to make at the shoulders are still visible, but I am going to make some
outer fantasy plate armor for Moira to wear over this that will include
some pauldrons, or shoulder caps, to hide those seams.
Watch this spot, more will be added!
Thursday, July 3, 2014
Friday, June 27, 2014
How I Dye Resin
My process for dyeing dolly parts: Prep is everything!
This isn't exactly instructions, but if you've been doing dyeing and it's not working, this is what I do.
Sand: To dye resin smoothly, use a stupidly high grit wet-sandpaper and an N95 or higher rated mask for you, and sand the part thoroughly to really smooth it out a little. (Don't let the dust get anywhere. It must not be inhaled by anything with fleshy lungs, so do this bit outside and make sure you clean up! Use water to keep the dust contained, then dispose of it carefully.)
Scrub: Then scrub the part with a Magic Eraser or melamine sponge equivalent. Then wash it with a drop of clear dish soap and water, making absolutely sure to get any oils from your fingers off it. After that, handle it only by the back and edges.
Dip: Put a bit of string or wire in a loop through the hole/s in the part to dip it into your dyepot. Make sure the string is long enough so the rising steam from the boiling dye doesn't hurt your hands. Use a small pot that isn't enameled, teflon-coated or aluminum; steel is best. Do this somewhere with daylight lighting so you can compare the part to the resin you're trying to match. If you're doing a whole doll in one color, start with an easy-to-clean part like a forearm, get it the shade you want, then match each part afterward to that. I like to open all my kitchen windows to get proper light for seeing color by. Bring water to simmering boil, add dye, stir with a cheap wooden spoon, not a metal one. It has to be boiling, but a rolling boil is too hot. Then you can dip the part in. Make notes of the precise amounts of dye you use, and the amount of water you started the pot with. You may need this info later.
Match: Go slowly- you can always add more color but taking color away is really, really annoying. Rinse the part in warm water to see what color you've actually gotten to, and to remove any excess dye.
Smoothing: Check it as you get close to the color you want, and if it's blotchy, take it out, scrub blotchy areas with magic eraser. Re-dip it again. Repeat as needed until you get the color you want. Rinse, allow to dry well and totally before using MSC to seal. If it isn't bone dry, the MSC will cloud.
Fin!
Troubleshooting:
"My first part has the wrong color/ is dyed too dark!" - Scrub it clean with a Magic Eraser and some WinsorNewton Brush Cleaner, and wash it with the dish soap again, rise totally clean of soap, then try again.
"My Tan dye is dyeing the doll blue!" (Or other unexpected color)- The chemistry has gone wrong. It's possible your pot has a coating, or is made of aluminum, or sometimes you can even just get a bad bottle of Rit. Scrub the part and try again, with some changes accordingly.
"My dyed doll has darker streaks on the sides of their parts, like where seam lines go." - Yep, that's where seams were. This is the nature of dolls cast in resin, and can't be totally gotten rid of. If the streaks are really dark, see the Smoothing step, and try that, but they won't be totally invisible on some dolls no matter what you do. Blushing can help.
"My doll has streaky spots..." - Do the Smoothing step over again, possibly including a bit of scrubbing with WN on the part where streaks are. residue of old sealant, finger oils or WN must all be scrubbed off then washed carefully off. Clean resin streaks much less.
"When I wiped a faceup attempt off my dyed doll, the dye color got lighter." - Yes, this can happen, as you tend to remove some dye with the faceup. This is why we made the notes about the dye and water mix we dyed it with. You can just replicate your dye recipe, wash your head/face really well, and re-dye it, or you can just blush the new faceup to account for lost color. The same goes for Body Blushing.
This isn't exactly instructions, but if you've been doing dyeing and it's not working, this is what I do.
Sand: To dye resin smoothly, use a stupidly high grit wet-sandpaper and an N95 or higher rated mask for you, and sand the part thoroughly to really smooth it out a little. (Don't let the dust get anywhere. It must not be inhaled by anything with fleshy lungs, so do this bit outside and make sure you clean up! Use water to keep the dust contained, then dispose of it carefully.)
Scrub: Then scrub the part with a Magic Eraser or melamine sponge equivalent. Then wash it with a drop of clear dish soap and water, making absolutely sure to get any oils from your fingers off it. After that, handle it only by the back and edges.
Dip: Put a bit of string or wire in a loop through the hole/s in the part to dip it into your dyepot. Make sure the string is long enough so the rising steam from the boiling dye doesn't hurt your hands. Use a small pot that isn't enameled, teflon-coated or aluminum; steel is best. Do this somewhere with daylight lighting so you can compare the part to the resin you're trying to match. If you're doing a whole doll in one color, start with an easy-to-clean part like a forearm, get it the shade you want, then match each part afterward to that. I like to open all my kitchen windows to get proper light for seeing color by. Bring water to simmering boil, add dye, stir with a cheap wooden spoon, not a metal one. It has to be boiling, but a rolling boil is too hot. Then you can dip the part in. Make notes of the precise amounts of dye you use, and the amount of water you started the pot with. You may need this info later.
Match: Go slowly- you can always add more color but taking color away is really, really annoying. Rinse the part in warm water to see what color you've actually gotten to, and to remove any excess dye.
Smoothing: Check it as you get close to the color you want, and if it's blotchy, take it out, scrub blotchy areas with magic eraser. Re-dip it again. Repeat as needed until you get the color you want. Rinse, allow to dry well and totally before using MSC to seal. If it isn't bone dry, the MSC will cloud.
Fin!
Troubleshooting:
"My first part has the wrong color/ is dyed too dark!" - Scrub it clean with a Magic Eraser and some WinsorNewton Brush Cleaner, and wash it with the dish soap again, rise totally clean of soap, then try again.
"My Tan dye is dyeing the doll blue!" (Or other unexpected color)- The chemistry has gone wrong. It's possible your pot has a coating, or is made of aluminum, or sometimes you can even just get a bad bottle of Rit. Scrub the part and try again, with some changes accordingly.
"My dyed doll has darker streaks on the sides of their parts, like where seam lines go." - Yep, that's where seams were. This is the nature of dolls cast in resin, and can't be totally gotten rid of. If the streaks are really dark, see the Smoothing step, and try that, but they won't be totally invisible on some dolls no matter what you do. Blushing can help.
"My doll has streaky spots..." - Do the Smoothing step over again, possibly including a bit of scrubbing with WN on the part where streaks are. residue of old sealant, finger oils or WN must all be scrubbed off then washed carefully off. Clean resin streaks much less.
"When I wiped a faceup attempt off my dyed doll, the dye color got lighter." - Yes, this can happen, as you tend to remove some dye with the faceup. This is why we made the notes about the dye and water mix we dyed it with. You can just replicate your dye recipe, wash your head/face really well, and re-dye it, or you can just blush the new faceup to account for lost color. The same goes for Body Blushing.
Monday, June 2, 2014
Moira's First Shoot
I am just loving this girl.
(Moira is a Fairyland Minifee Mirwen on a Female-modded Male A-Line Muscle body in NS)
Thursday, May 15, 2014
Mod Project- Minifee Muscular Girl, Part III
Doll Nudity Ahoy! NSFW.
This is part III of a project.
Part II is here.
Part I is here.
Now that I have moved into a place with a yard, I can spray sealant whenever the weather permits. This let me get on with my Minifee mod project.
(Good News: Gradually I will be moving my studio operations here to my home, and when I have an In-House studio I get a LOT more work done.)
I was able to blush Moira and give her the scars appropriate to someone who fights. I got her a head set at last, and those got faceupped to match. She is a Minifee Mirwen sculpt. (In this pic her chest piece looks like it really doesn't match the rest of her, but that's an optical illusion- only her bust does not match, and it'll be under clothes.)
Here's a close look at that faceup and her hand with all the little scars and nicks on it.
The only thing I've left undone is to give a touch of satin gloss to her fingernails and lips, and that's because I don't have gloss here. I'll have to fetch it from my downtown studio.
Here's the full effect of head finally on shoulders! I am so excited to finally have her in one piece! I was worried the head wouldn't match the dynamism of the body, but I think the Mirwen sculpt's strong brows and resolute expression make it work.
(Yes, I know her breasts don't match the resin- I got it as close as I could, and gave her a hint of nipples so she wouldn't look too weird to me, but she's never gonna be in shoots fully topless so it doesn't matter that the paint is not perfect.)
Here's how she looks so far! I've made her a burnt orange tunic and these little cropped short pants. I tried to make her some shoes but I am not happy with the results yet. Besides, she needs boots. I'll have to make them myself because no one sells what I want her to wear. Sigh, story of almost all my dolly wardrobes. I think this here is what she'd wear while she's working out- just pants and her 'bra' top.
Annnnnd that's as far as we've gotten! I got her sword from eb@y, if anyone is looking for similar.
So far she lacks eyes and wig, but there's a Doll Fair coming to my area soon, and while it's mostly traditional vinyl and china dollies, in the last few years there have been a few people selling BJD things and supplies as well. I'll take her to the Doll Fair with me and get her some eyes and hair. I love the thought of being able to try wigs on her before I buy them. Some looks will just not work for her. I am imagining her with probably brown hair, but we'll see.
Update!
I made these shoes a few years back for my Medieval Reenactment hobby, and I wear them all the time for comfort. Since they are quite simple in structure, I opted to duplicate them for Moira to have some casual footwear. (*history soapbox* These are often called Ghillie Brogues or "bog" shoes, and are a very simple shoe of a type worn in many parts of Northwestern Europe, from the early Dark Ages all the way into the mid- and even late- Medieval period.)
Here they are on her feet. I took Moira with me to a local Doll Fair to
get her a wig and some eyes, and our matching shoes amused several
people.
And here she is! I did not expect her to end up with this hairstyle but I tried the wig on her and it was just right. It's a Monique "Alexis", and I think it's a 6-7, snug fit. It needs some product on it to smooth flyaways but I do like it. Her eyes are glass 12mm Greens of an unknown brand, I think the dealer said something like "Anna Tina"?
That completes her modification! Someday I'll do another Project post set when I make her some armor.
This is part III of a project.
Part II is here.
Part I is here.
Now that I have moved into a place with a yard, I can spray sealant whenever the weather permits. This let me get on with my Minifee mod project.
(Good News: Gradually I will be moving my studio operations here to my home, and when I have an In-House studio I get a LOT more work done.)
I was able to blush Moira and give her the scars appropriate to someone who fights. I got her a head set at last, and those got faceupped to match. She is a Minifee Mirwen sculpt. (In this pic her chest piece looks like it really doesn't match the rest of her, but that's an optical illusion- only her bust does not match, and it'll be under clothes.)
Here's a close look at that faceup and her hand with all the little scars and nicks on it.
The only thing I've left undone is to give a touch of satin gloss to her fingernails and lips, and that's because I don't have gloss here. I'll have to fetch it from my downtown studio.
Here's the full effect of head finally on shoulders! I am so excited to finally have her in one piece! I was worried the head wouldn't match the dynamism of the body, but I think the Mirwen sculpt's strong brows and resolute expression make it work.
(Yes, I know her breasts don't match the resin- I got it as close as I could, and gave her a hint of nipples so she wouldn't look too weird to me, but she's never gonna be in shoots fully topless so it doesn't matter that the paint is not perfect.)
Here's how she looks so far! I've made her a burnt orange tunic and these little cropped short pants. I tried to make her some shoes but I am not happy with the results yet. Besides, she needs boots. I'll have to make them myself because no one sells what I want her to wear. Sigh, story of almost all my dolly wardrobes. I think this here is what she'd wear while she's working out- just pants and her 'bra' top.
Annnnnd that's as far as we've gotten! I got her sword from eb@y, if anyone is looking for similar.
So far she lacks eyes and wig, but there's a Doll Fair coming to my area soon, and while it's mostly traditional vinyl and china dollies, in the last few years there have been a few people selling BJD things and supplies as well. I'll take her to the Doll Fair with me and get her some eyes and hair. I love the thought of being able to try wigs on her before I buy them. Some looks will just not work for her. I am imagining her with probably brown hair, but we'll see.
Update!
I made these shoes a few years back for my Medieval Reenactment hobby, and I wear them all the time for comfort. Since they are quite simple in structure, I opted to duplicate them for Moira to have some casual footwear. (*history soapbox* These are often called Ghillie Brogues or "bog" shoes, and are a very simple shoe of a type worn in many parts of Northwestern Europe, from the early Dark Ages all the way into the mid- and even late- Medieval period.)
And here she is! I did not expect her to end up with this hairstyle but I tried the wig on her and it was just right. It's a Monique "Alexis", and I think it's a 6-7, snug fit. It needs some product on it to smooth flyaways but I do like it. Her eyes are glass 12mm Greens of an unknown brand, I think the dealer said something like "Anna Tina"?
That completes her modification! Someday I'll do another Project post set when I make her some armor.
Tuesday, May 6, 2014
Hands Rides a Horse
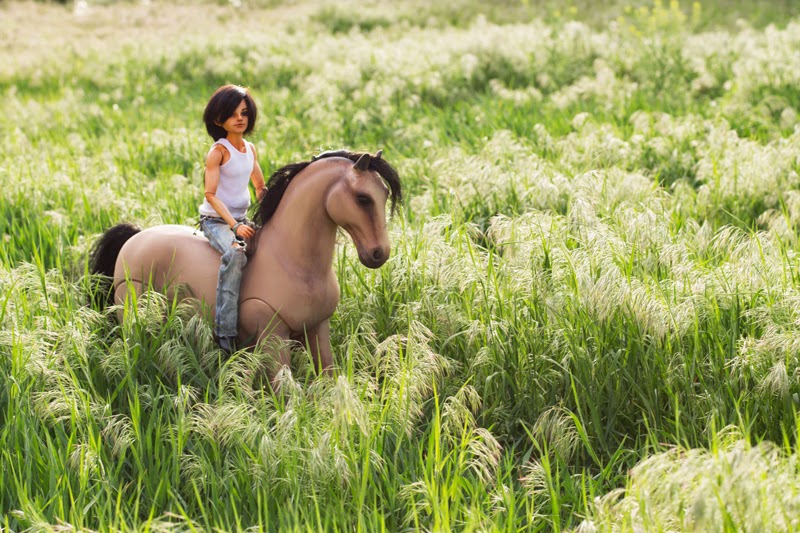
This is a repaint and re"wigged" Our Generation toy horse I have worked on, in my first attempt so far. These horses look like stocky little warmbloods or big ponies for MSDs. Someday when I get an airbrush I'll redo some of the paint, but for a brush job it's not bad. The horse will not belong to Hands, but he was the only MSD dressed to go riding so he got to do the shoot.
Monday, April 7, 2014
Mod Project- Minifee Muscular Girl part II
This is part II of a project.
Part I is here.
Part III is here.
Part I is here.
Part III is here.
Here is the current muscle body next to a Minifee female body with "small" (medium) bust.
Now, I tried, and tried, and tried to get the paint to blend into the resin, but here is my Modification Achilles Heel- I can't get that to look smooth. I probably won't until I learn to use an airbrush. I realized after failing the 8th or 9th time that what I was trying to paint over would be almost always clothed anyway, and for the rare exception I could smooth it out in PS. Someday I shall redo this with an airbrush, but not right now. So for now, I painted it to be close to the resin color, and then got on with making her some underwear.
Here's her bra: kind of clumsy compared to modern lingerie, but I have her character in a fantasy
setting, not a modern one. Her clothes aren't going to look modern. I
plan to post stuff I sew for her here,
because she's going to require custom clothes. Stuff that fits either
male or female MNF bodies won't fit her.
Here's one more shot of her in her little mini-shorts and bra. I can't
wait to get her a proper head and do her blushing and faceup. Aithne
there next to her is a MNF/Unoa Sist Hybrid.
Thursday, February 27, 2014
Mod Project- Minifee Muscular Girl -part I
NSFW Doll Nudity Ahoy!
This is part I of a project.
Part II is here.
Part III is here.
Artist's foreword: Yes, I am constantly modding something. Yes, it makes me happy, so I'll probably keep doing it. Yes I have several other projects on. Yes, each of them will get done in due time, don't worry.
I glanced at a very feminine pic of someone's Fairyland Minifee Muscle bodied boy, (I don't recall which) and for a moment I saw something else. The idea of what I saw stuck with me. I often get the best ideas for art from what I think I see for a moment, not what I am actually looking at. I saw the idea for a Minifee girl with muscles, but still very much a girl. Her own different kind of beautiful. That vision captivated me, and I had to create this doll. She'll fit very nicely into a fantasy story I've been pondering in which the main cast is mostly girls.
So far she's just a male body I bought and have been modding. Eventually I'll get her a head and a sleeping head; I've already chosen which sculpt. Here's where we started, for a reference. A Minifee A-Line Muscle boy in NS. Ignore the horse, please.
First, the obvious- Removing the male genitals and replacing them. I haven't finished by giving her labia yet, but here's how far this part's gotten. I also removed all the seams on this hip piece.
I've been removing seams as I go. I've found I like dolls without visible seams when I can get them that way. For any of my own dolls I mod, I've started just doing seam sanding as a matter of course, while I have them in pieces anyway.
Then, reshaping the abs. Most women have generally different abdominal
shapes than men, and every individual has different ab shapes anyway.
This is a nice soft shape for a slim and athletic girl, but the gal I am making here has even less body fat, so I'll need more definition than this. Still, I will remember this shape when I do other sculpting work.
On many women, the outline of the main "sixpack" muscle set is like a
chubby vase sort of shape. I added the bottom edge of the ribcage above
the stomach muscles, and I have scraped away a teeny bit of the waist on
each side, to give the impression of the hourglass torso slim women
have, resulting from the curve of their hips and how the muscles anchor
to it. Much of female anatomy is determined by the bowl shape of their
hips- men's hips are more of a box.
Here's the lower-body-fat, redefined abs, and the chest piece.
All that sanding changed the resin tone of some places a little, so I will have to blush and sand to get it all to match again. Not a problem.
I've scraped and sanded down the "adam's apple" of the throat, which does not protrude on a woman as it does on a man.
I sanded off the male nipples so they'd quit distracting my eye as I try to position the female breasts over the pectoral muscle.
Seams also got sanded again, wherever I found them.
The Apoxie here is tinted so I can cover it easier- blueish grey Apoxie is harder to paint over and blend into the NS than peach-brown. The breasts of a woman with this much muscle definition and this low of body-fat are usually quite small, and her muscle tone would give them a nice perky shape, perhaps. Breast tissue in humans sits right on top of Pectoral muscle but does not necessarily cover it entirely, especially if the pecs are large and the breasts are smaller.
Part II is here.
Part III is here.
This is part I of a project.
Part II is here.
Part III is here.
Artist's foreword: Yes, I am constantly modding something. Yes, it makes me happy, so I'll probably keep doing it. Yes I have several other projects on. Yes, each of them will get done in due time, don't worry.
I glanced at a very feminine pic of someone's Fairyland Minifee Muscle bodied boy, (I don't recall which) and for a moment I saw something else. The idea of what I saw stuck with me. I often get the best ideas for art from what I think I see for a moment, not what I am actually looking at. I saw the idea for a Minifee girl with muscles, but still very much a girl. Her own different kind of beautiful. That vision captivated me, and I had to create this doll. She'll fit very nicely into a fantasy story I've been pondering in which the main cast is mostly girls.
So far she's just a male body I bought and have been modding. Eventually I'll get her a head and a sleeping head; I've already chosen which sculpt. Here's where we started, for a reference. A Minifee A-Line Muscle boy in NS. Ignore the horse, please.
First, the obvious- Removing the male genitals and replacing them. I haven't finished by giving her labia yet, but here's how far this part's gotten. I also removed all the seams on this hip piece.
I've been removing seams as I go. I've found I like dolls without visible seams when I can get them that way. For any of my own dolls I mod, I've started just doing seam sanding as a matter of course, while I have them in pieces anyway.
This is a nice soft shape for a slim and athletic girl, but the gal I am making here has even less body fat, so I'll need more definition than this. Still, I will remember this shape when I do other sculpting work.
All that sanding changed the resin tone of some places a little, so I will have to blush and sand to get it all to match again. Not a problem.
I've scraped and sanded down the "adam's apple" of the throat, which does not protrude on a woman as it does on a man.
I sanded off the male nipples so they'd quit distracting my eye as I try to position the female breasts over the pectoral muscle.
Seams also got sanded again, wherever I found them.
The Apoxie here is tinted so I can cover it easier- blueish grey Apoxie is harder to paint over and blend into the NS than peach-brown. The breasts of a woman with this much muscle definition and this low of body-fat are usually quite small, and her muscle tone would give them a nice perky shape, perhaps. Breast tissue in humans sits right on top of Pectoral muscle but does not necessarily cover it entirely, especially if the pecs are large and the breasts are smaller.
Part II is here.
Part III is here.
Subscribe to:
Posts (Atom)