Friday, April 10, 2026

State of the Workshop 2026- Reflecting, and Moving Forth

 So it's been years, but mostly everything is still as it was, since I've been too ill to do much doll stuff until VERY recently. Yes, I am still very much Chronically Ill. A nasty health scare in Nov 2025 got me onto the right meds, or at least some that are helping, but recovery from that low point has been slow, if mostly steady. I have begun to be able to do bits of doll work again this last couple of weeks, and it's super delightful.

Of course RIGHT as this happens, Den of Angels announces that, as the only person with Admin Privileges refuses to answer any messaging of any kind (?????? like why would you do this to us all when a couple words and a hand-off of info in a text would stop it??) the overworked Moderators will have to close the biggest, longest-lasting English language resource on Resin BJD.

I've been on there since 2009, nearly every single day, and this is devastating in ways I cannot describe, as 80% of my social interaction and reach with other humans is online, due to illness.

Hope remains in the fact that Armeleia, who helped found DoA, is working on a new forum to be similar in many ways, taking input via their Instagram, and they're kind of an awesome human being I will owe so much to if this works. I intend to volunteer time at least helping new-hobbyist people and tagging problems for other moderators; since I basically live online and have years and years of experience with the hobby, I'm a good candidate for an Assistant Moderator.

 I will also be using this blog a lot more, or that's my goal anyway.

If you're here from Den of Angels, halloo! *wave* Do say Hi!

I gotta get to updating stuff around here, it's dust and cobwebs and old info. Sheesh. Well, I have time. Energy and brain-power are the low commodities around here.


In actual Doll Shelf news!
 I have inherited a large number of antique dolls from my Great Aunt and her sister, my Grandmother, so I've been studying up learning to repair Composition dolls from the 1930s, which many of them are. I'm kind of in love with these little gals.

 I've learned a lot, and I've also picked up a couple dolls from the Bay of E to practice learning on so I don't mess up my inheritance bunch. It turns out that a lot of my skills from BJD modding and my art training are transferable to vinyl dolls, Barbie, and antique doll repair. I know how to spot good quality supplies, I know a lot of the materials used and their properties, and I have a lot of the tools necessary. I have also learned a lot of tiny-sewing skills, and things like wig and shoemaking. 
So you can expect to see some of those projects of repair in between Resin BJD stuff here.

In the last couple years, when I have been able, I've been doing work on Clara, having made her that Battle Scene Nightgown, and a Dance of Reeds/Snowflake bodice and pancake tutu that I am very proud of, as well as a Waltz of the Flowers bodice and romantic tutu. I kinda want to make headbands for both. They need a little accent to be complete. I also need to keep trying to make suitable pointe shoes for her little feet. it's an ongoing battle. Maybe this year I can make her a ballet studio backdrop and some stage scenery paintings to pose in front of.

I have also started my Alice in Wonderland BJD. She's the same size as Clara, just the other face sculpt that was sold in the same line from Doll Family- H. Her expression is bafflement, which I think is perfect. I tried to make her wig but it defeated me so I gave up and bought one for her. Other than the style of the wig (parted, not swept back) I am trying to outfit her as close to the Tenniel engravings as possible.

 I have also assembled her pal the Chesire Cat, out of Dream Valley and other parts, and he's 1/6 so he's only a little shorter than she is and grinning properly. I made his eyes from the kit ones, and they came out great. He's a grey tabby, or will be when I am done, with a partly white face and white paws.

I want them to be in a little tea party scene diorama/shadowbox, and I've also made a LOT of neat treats intended for that. I love making tiny desserts!

OH! I almost forgot! My Dad and Brother helped me finally realize the Dream- big glass front cabinet bookcases for the dolls in my downstairs room! It's really cool. Right now I have a lot of the whole cast down there in those. It's pretty dim in there most of the time and the glass keeps them from getting dusty which is nice.


 I'll put tags on this later- for now my hands are tired. TTYL!

Sunday, September 1, 2024

Dolly state of the Workshop, 2024


 The FIFTH year of the Pandemic is almost over. Is the pandemic? No, but people are pretending it is. *RANT*

Double Ugh. I still cannot go out in public much, due to surges. Autumn is my time to go outdoors though, so I can still attend outdoor things. 

I will add pics to this post as I take them- this blog is less for anyone to see nowadays than it is for me to log what I'm working on.

So... I STILL have the Rose of Venice, a restoration project Asleep Eidolon Yara, and she's partly dressed and needs painting. I have made her camicia/chemise. Next is the body of her gown I think. I want to do Documentation on this project and submit it under Arts and Sciences at some SCA Event. If I didn't have other stuff to do, I'd aim to have it done by Toys For Tots Event in November.

The DF-H Xiao Chan in 1/5 size did turn out to be named Clara. I gave her an overall pinky dye job as she was just TOO pale. She has a Snowflake and a Waltz of the Flowers costume from The Nutcracker, made these last two winters. This year I've been doing her Nightgown from the Battle Scene.

I've got a second doll in that size concepted out to be my Alice in Wonderland. I can use Clara as a model to make Alice's clothes and things. I am trying to make her look like the John Tenniel illustrations. I've also got plans for a future Cheshire cat 1/6 companion for her.

The Brother Martin doll head is on the shelf, next to a Saith head (another OC) doll and a Mallory head (another OC) I am keeping them on Bust Stands, along with my Self Portrait Nakana doll Panya head that will be painted to look like me. It's seriously exactly my face! Yves' doll was too tall bodied so I switched him to a Doll Leaves body that isn't here yet. the Volks body went to my Dollshe Aramis who is becoming my RPG character Rosslyn.

I have two Fantasy Minifees waiting their turns. Ondine is a Celine with a Sia seahorse tail I want to make a tailfin for, and Joscelin is a faun Mirwen head. One of my only doubles.

I have this totally odd Cartoony face Ramcube Q-bi doll on a chunkier Myoudoll Anime1/4 body and she's a dyed doll that is nothing like my other dolls... but we'll have to trust the process on her. She's meant to be different. More Western Dolly looking. She keeps getting named Stacey in my head, so that's sticking, and she's the one on the workbench at the moment. I am going to use working on her to get my hand back in for a season of Blushing and Faceups this Fall and Winter.

I also have a couple of other peoples' dolls on the workbench and those take priority over my stuff. I have sculpted and made molds for these doll finger repairs I'm doing, and those are very exciting- going to try casting in resin! Gotta make some fingers for repairs, and then make a headcap to replace a missing one.

...And Barleysugar the Deermouse STILL needs blushing.

Friday, October 1, 2021

Dolly Plans 2021-2022

 The second year of the Pandemic is almost completed. UGH. Dolls are a much nicer thing to think about.

So I have the Rose of Venice, a restoration project, and she's partly dressed and needs painting.

I have DF-H Xiao Chan coming in December, and she will possibly be named Clara. She'll have the company faceup, but will need blushing. Maybe joint dyeing, so she doesn't wear through it as fast.

I have a head for a Brother Martin doll but the trouble there is that it's so big. Maybe too big. I don't want any more dolls 70cm or over, not when I can barely handle them. But I can't find a better face.

I have the body for my Yves doll. Another OC. It is beautiful. Clothes and wig for him will be arriving with his head, also due sometime in December at the earliest.

And Barleysugar the Deermouse needs blushing but I can't seem to decide how to do it.


I also have plans to make that Safavid Persian outfit for Amadi.

There, that's the current list.

Friday, August 20, 2021

Restoration: a Rose of Venice, part 1, the Cleanup


I am nicknaming this restoration project doll Rose, and she's had a journey.

I found her on the Bay of E, and other doll collectors had pointed out the lower price of the listing but no one was sure if she was legitimate. Being 'older' in the hobby than some, I recognized that this doll is an older sculpt from back in 2008-2010 style, when recasts weren't such a terrible problem like they are now. So I gambled on her being legit and my own instincts being correct, snagged the sale and got her to my house. 

Detective work ensued! It too AGES to find her original provenance, but she had marks inside the head that helped. The body was just such an older style it was hard to find. She was an Asleep Eidolon Yara, and was probably made in 2009 or 10! Besides some cosmetic stuff, she was in great shape, no major dents or cracks.

She was clearly someone's special girl, and was very well loved. Don't worry, Rose, we'll have you feeling just as loved again soon!

One other way I found her source company was because her factory faceup was still there, I think, especially those eyebrows. She'd been decorated by whoever used to have her, but some of it was glittery nail polish, which can damage resin sometimes. But as it flaked off, the resin beneath showed no damage! With a wig and a dress we can see she's really quite sweet, she just needs some new faceup and blushwork.

 
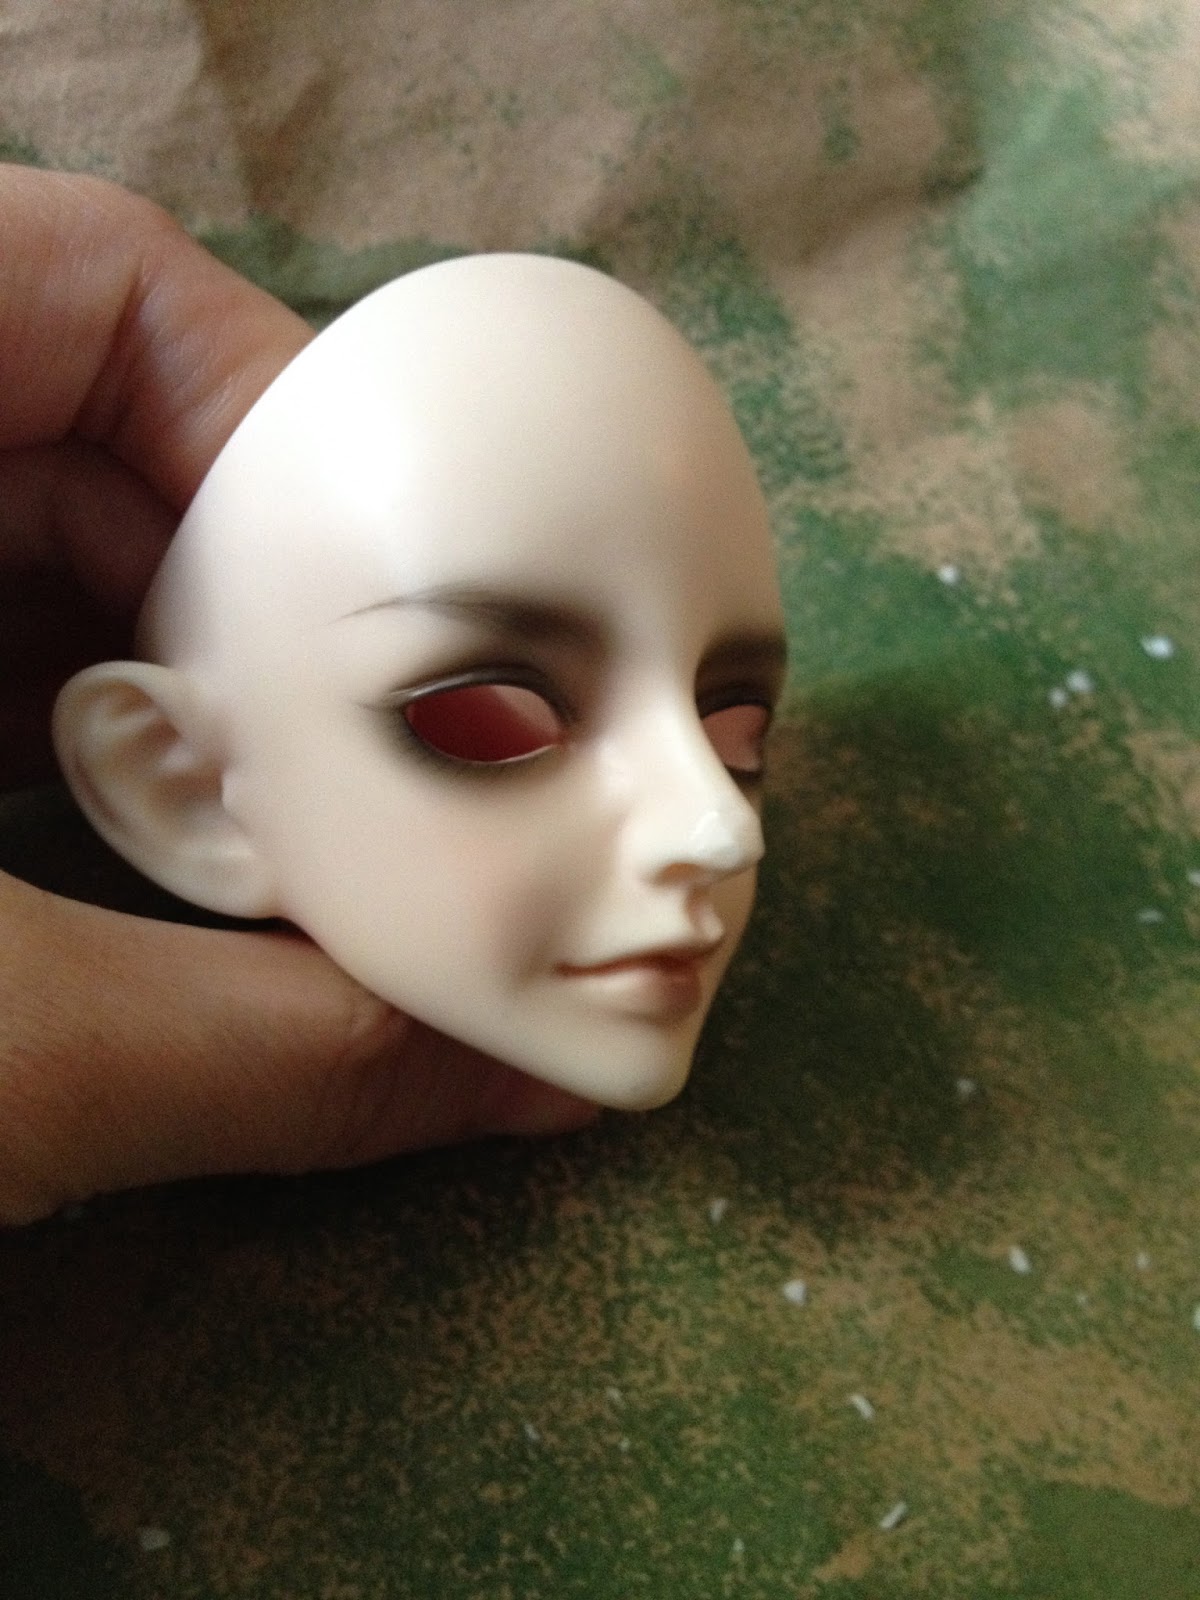
Here's her face all scrubbed blank and clean. I even did a little sanding to a level to remove some of her yellowing as well. Her mouth, under the nail polish, was undamaged. She's even got little teefs visible.


Here she is in all her scrubbed clean glory! She is gently yellowed, and I might restore the pinks faded out from her resin with a light dye bath, or just with how I blush her.


Saturday, January 9, 2021

How to Fix Dented Doll Nose

 (good grief it's been ages.)


How To Fix A Dinged Nose

1. remove eyes, store safely somewhere, don't need those falling out.
2. Cover faceup and head with plastic wrap, ripping the smallest possible jagged hole to expose where the nose damage is. Do this with about three layers of the stuff, the idea is to get a jagged edged hole around the damage.
3. Put on oven mitt. Put the kettle on. As the steam whooshes out when the kettle boils, poke the injured nose into the steam at least two or three inches from the spout. Hold it there for five seconds, remove to check to see if resin has popped back to shape, repeat as needed or until you're not getting any more result.

That's the dings and dents solved. As for the blushing of the nose.
PART two!

1. Remove plastic wrap. Replace with a paper towel, and again tear to expose the nose. This masks off the rest of the face but leaves a soft edge around the nose.
2. Get a melamine sponge, of the mister clean or other type brand. Now what you do with that is DO NOT wet it, but using it dry, treat it like it's a sanding block and gently sand away the damaged blushing, going lighter at the edges of the damaged area. This prevents any sharp edges between blushed and non blushed areas. You'll see as you go that you can "erase" the color in the damaged spot and create a soft airbrushy edge or fading of color from that spot, if that makes sense.
3. Wearing proper respiration protection and under proper conditions, this is when you hit the almost-totally-covered face with a puff of sealant. Our ragged hole paper towel masking technique is what lets this work.
4. Mix a color match for the other blushing visible around the nose, as carefully as you can, using quality pastels. Then blush back the color onto the now sealed nose with a very fine soft brush. Using the best brush you can really makes a difference here for layering on very tiny amounts of color at a time so as to get a smooth match.
5. Seal again, remove the paper towel, admire the flawless repair, and never trust a dolly not to nosedive.
How To Fix A Dinged Nose

1. remove eyes, store safely somewhere, don't need those falling out.
2. Cover faceup and head with plastic wrap, ripping the smallest possible jagged hole to expose where the nose damage is. Do this with about three layers of the stuff, the idea is to get a jagged edged hole around the damage.
3. Put on oven mitt. Put the kettle on. As the steam whooshes out when the kettle boils, poke the injured nose into the steam at least two or three inches from the spout. Hold it there for five seconds, remove to check to see if resin has popped back to shape, repeat as needed or until you're not getting any more result.

That's the dings and dents solved. As for the blushing of the nose.
PART two!

1. Remove plastic wrap. Replace with a paper towel, and again tear to expose the nose. This masks off the rest of the face but leaves a soft edge around the nose.
2. Get a melamine sponge, of the mister clean or other type brand. Now what you do with that is DO NOT wet it, but using it dry, treat it like it's a sanding block and gently sand away the damaged blushing, going lighter at the edges of the damaged area. This prevents any sharp edges between blushed and non blushed areas. You'll see as you go that you can "erase" the color in the damaged spot and create a soft airbrushy edge or fading of color from that spot, if that makes sense.
3. Wearing proper respiration protection and under proper conditions, this is when you hit the almost-totally-covered face with a puff of sealant. Our ragged hole paper towel masking technique is what lets this work.
4. Mix a color match for the other blushing visible around the nose, as carefully as you can, using quality pastels. Then blush back the color onto the now sealed nose with a very fine soft brush. Using the best brush you can really makes a difference here for layering on very tiny amounts of color at a time so as to get a smooth match.
5. Seal again, remove the paper towel, admire the flawless repair, and never trust a dolly not to nosedive.

 How To Fix A Dented Dolly Nose

1. remove eyes, store safely somewhere, don't need those falling out.
2. Cover faceup and head with plastic wrap, ripping the smallest possible jagged hole to expose where the nose damage is. Do this with about three layers of the stuff, the idea is to get a jagged edged hole around the damage.
3. Put on oven mitt. Put the kettle on. As the steam whooshes out when the kettle boils, poke the injured nose into the steam at least two or three inches from the spout. Hold it there for five seconds, remove to check to see if resin has popped back to shape, repeat as needed or until you're not getting any more result.

That's the dings and dents solved. As for the blushing of the nose.
PART two! This can be used to spot-fix any part of a faceup. It's not always guaranteed to work, and depends on your skill as well as dumb luck, YMMV but it's always worth a shot.


1. Remove plastic wrap. Replace with a paper towel, and again tear to expose the nose. This masks off the rest of the face but leaves a soft edge around the nose.
2. Get a melamine sponge, of the mister clean or other type brand. Now what you do with that is DO NOT wet it, but using it dry, treat it like it's a sanding block and gently sand away the damaged blushing, going lighter at the edges of the damaged area. This prevents any sharp edges between blushed and non blushed areas. You'll see as you go that you can "erase" the color in the damaged spot and create a soft airbrushy edge or fading of color from that spot, if that makes sense.
3. Wearing proper respiration protection and under proper conditions, this is when you hit the almost-totally-covered face with a puff of sealant. Our ragged hole paper towel masking technique is what lets this work.
4. Mix a color match for the other blushing visible around the nose, as carefully as you can, using quality pastels. Then blush back the color onto the now sealed nose with a very fine soft brush. Using the best brush you can really makes a difference here for layering on very tiny amounts of color at a time so as to get a smooth match.
5. Seal again, remove the paper towel, stick the eyes back in now, admire the flawless repair, and never trust a dolly not to nosedive.

 
How To Fix A Dinged Nose

1. remove eyes, store safely somewhere, don't need those falling out.
2. Cover faceup and head with plastic wrap, ripping the smallest possible jagged hole to expose where the nose damage is. Do this with about three layers of the stuff, the idea is to get a jagged edged hole around the damage.
3. Put on oven mitt. Put the kettle on. As the steam whooshes out when the kettle boils, poke the injured nose into the steam at least two or three inches from the spout. Hold it there for five seconds, remove to check to see if resin has popped back to shape, repeat as needed or until you're not getting any more result.

That's the dings and dents solved. As for the blushing of the nose.
PART two!

1. Remove plastic wrap. Replace with a paper towel, and again tear to expose the nose. This masks off the rest of the face but leaves a soft edge around the nose.
2. Get a melamine sponge, of the mister clean or other type brand. Now what you do with that is DO NOT wet it, but using it dry, treat it like it's a sanding block and gently sand away the damaged blushing, going lighter at the edges of the damaged area. This prevents any sharp edges between blushed and non blushed areas. You'll see as you go that you can "erase" the color in the damaged spot and create a soft airbrushy edge or fading of color from that spot, if that makes sense.
3. Wearing proper respiration protection and under proper conditions, this is when you hit the almost-totally-covered face with a puff of sealant. Our ragged hole paper towel masking technique is what lets this work.
4. Mix a color match for the other blushing visible around the nose, as carefully as you can, using quality pastels. Then blush back the color onto the now sealed nose with a very fine soft brush. Using the best brush you can really makes a difference here for layering on very tiny amounts of color at a time so as to get a smooth match.
5. Seal again, remove the paper towel, admire the flawless repair, and never trust a dolly not to nosedive.
How To Fix A Dinged Nose

1. remove eyes, store safely somewhere, don't need those falling out.
2. Cover faceup and head with plastic wrap, ripping the smallest possible jagged hole to expose where the nose damage is. Do this with about three layers of the stuff, the idea is to get a jagged edged hole around the damage.
3. Put on oven mitt. Put the kettle on. As the steam whooshes out when the kettle boils, poke the injured nose into the steam at least two or three inches from the spout. Hold it there for five seconds, remove to check to see if resin has popped back to shape, repeat as needed or until you're not getting any more result.

That's the dings and dents solved. As for the blushing of the nose.
PART two!

1. Remove plastic wrap. Replace with a paper towel, and again tear to expose the nose. This masks off the rest of the face but leaves a soft edge around the nose.
2. Get a melamine sponge, of the mister clean or other type brand. Now what you do with that is DO NOT wet it, but using it dry, treat it like it's a sanding block and gently sand away the damaged blushing, going lighter at the edges of the damaged area. This prevents any sharp edges between blushed and non blushed areas. You'll see as you go that you can "erase" the color in the damaged spot and create a soft airbrushy edge or fading of color from that spot, if that makes sense.
3. Wearing proper respiration protection and under proper conditions, this is when you hit the almost-totally-covered face with a puff of sealant. Our ragged hole paper towel masking technique is what lets this work.
4. Mix a color match for the other blushing visible around the nose, as carefully as you can, using quality pastels. Then blush back the color onto the now sealed nose with a very fine soft brush. Using the best brush you can really makes a difference here for layering on very tiny amounts of color at a time so as to get a smooth match.
5. Seal again, remove the paper towel, admire the flawless repair, and never trust a dolly not to nosedive.

How To Fix A Dinged Nose

1. remove eyes, store safely somewhere, don't need those falling out.
2. Cover faceup and head with plastic wrap, ripping the smallest possible jagged hole to expose where the nose damage is. Do this with about three layers of the stuff, the idea is to get a jagged edged hole around the damage.
3. Put on oven mitt. Put the kettle on. As the steam whooshes out when the kettle boils, poke the injured nose into the steam at least two or three inches from the spout. Hold it there for five seconds, remove to check to see if resin has popped back to shape, repeat as needed or until you're not getting any more result.

That's the dings and dents solved. As for the blushing of the nose.
PART two!

1. Remove plastic wrap. Replace with a paper towel, and again tear to expose the nose. This masks off the rest of the face but leaves a soft edge around the nose.
2. Get a melamine sponge, of the mister clean or other type brand. Now what you do with that is DO NOT wet it, but using it dry, treat it like it's a sanding block and gently sand away the damaged blushing, going lighter at the edges of the damaged area. This prevents any sharp edges between blushed and non blushed areas. You'll see as you go that you can "erase" the color in the damaged spot and create a soft airbrushy edge or fading of color from that spot, if that makes sense.
3. Wearing proper respiration protection and under proper conditions, this is when you hit the almost-totally-covered face with a puff of sealant. Our ragged hole paper towel masking technique is what lets this work.
4. Mix a color match for the other blushing visible around the nose, as carefully as you can, using quality pastels. Then blush back the color onto the now sealed nose with a very fine soft brush. Using the best brush you can really makes a difference here for layering on very tiny amounts of color at a time so as to get a smooth match.
5. Seal again, remove the paper towel, admire the flawless repair, and never trust a dolly not to nosedive.

How To Fix A Dinged Nose

1. remove eyes, store safely somewhere, don't need those falling out.
2. Cover faceup and head with plastic wrap, ripping the smallest possible jagged hole to expose where the nose damage is. Do this with about three layers of the stuff, the idea is to get a jagged edged hole around the damage.
3. Put on oven mitt. Put the kettle on. As the steam whooshes out when the kettle boils, poke the injured nose into the steam at least two or three inches from the spout. Hold it there for five seconds, remove to check to see if resin has popped back to shape, repeat as needed or until you're not getting any more result.

That's the dings and dents solved. As for the blushing of the nose.
PART two!

1. Remove plastic wrap. Replace with a paper towel, and again tear to expose the nose. This masks off the rest of the face but leaves a soft edge around the nose.
2. Get a melamine sponge, of the mister clean or other type brand. Now what you do with that is DO NOT wet it, but using it dry, treat it like it's a sanding block and gently sand away the damaged blushing, going lighter at the edges of the damaged area. This prevents any sharp edges between blushed and non blushed areas. You'll see as you go that you can "erase" the color in the damaged spot and create a soft airbrushy edge or fading of color from that spot, if that makes sense.
3. Wearing proper respiration protection and under proper conditions, this is when you hit the almost-totally-covered face with a puff of sealant. Our ragged hole paper towel masking technique is what lets this work.
4. Mix a color match for the other blushing visible around the nose, as carefully as you can, using quality pastels. Then blush back the color onto the now sealed nose with a very fine soft brush. Using the best brush you can really makes a difference here for layering on very tiny amounts of color at a time so as to get a smooth match.
5. Seal again, remove the paper towel, admire the flawless repair, and never trust a dolly not to nosedive.

How To Fix A Dinged Nose

1. remove eyes, store safely somewhere, don't need those falling out.
2. Cover faceup and head with plastic wrap, ripping the smallest possible jagged hole to expose where the nose damage is. Do this with about three layers of the stuff, the idea is to get a jagged edged hole around the damage.
3. Put on oven mitt. Put the kettle on. As the steam whooshes out when the kettle boils, poke the injured nose into the steam at least two or three inches from the spout. Hold it there for five seconds, remove to check to see if resin has popped back to shape, repeat as needed or until you're not getting any more result.

That's the dings and dents solved. As for the blushing of the nose.
PART two!

1. Remove plastic wrap. Replace with a paper towel, and again tear to expose the nose. This masks off the rest of the face but leaves a soft edge around the nose.
2. Get a melamine sponge, of the mister clean or other type brand. Now what you do with that is DO NOT wet it, but using it dry, treat it like it's a sanding block and gently sand away the damaged blushing, going lighter at the edges of the damaged area. This prevents any sharp edges between blushed and non blushed areas. You'll see as you go that you can "erase" the color in the damaged spot and create a soft airbrushy edge or fading of color from that spot, if that makes sense.
3. Wearing proper respiration protection and under proper conditions, this is when you hit the almost-totally-covered face with a puff of sealant. Our ragged hole paper towel masking technique is what lets this work.
4. Mix a color match for the other blushing visible around the nose, as carefully as you can, using quality pastels. Then blush back the color onto the now sealed nose with a very fine soft brush. Using the best brush you can really makes a difference here for layering on very tiny amounts of color at a time so as to get a smooth match.
5. Seal again, remove the paper towel, admire the flawless repair, and never trust a dolly not to nosedive.

Saturday, December 22, 2018

1/6 world

I've been sucked down the 1/6 rabbithole.
 Luckily I think I am satisfied with my number of character/dolls, so they are now gonna just be an excuse for dioramas and modeling. Rather like my two Azone 1/12 plastic dollies. The 1/6 crew are from the Star Wars galaxy far far away. 

One is a younger version of Kelseph, a former rpg character of mine; one is a Jedi mystic, special Seed Dolls handcast head; and one is this girl I got so there'd be a non-Jedi humanoid in the bunch and she's quickly gaining personality. They've also got a MissMonster HUND as their trusty Droid pal.

This is our Jedi mystic, an alien male who is a very calm sort of person. Sometimes aggravatingly so.

Thursday, September 6, 2018

A few of the Least-Expensive Legit BJDs Rosslyn Could Find

So we know this hobby is expensive. 

It's tough to want a beautiful doll and not be able to afford it.

 We don't want to buy stolen goods so a recast is right out.

Which are the completely least expensive but still beautiful resin ball jointed dolls?
Here's a few lovelies I have hunted up.

Even the famous Fairyland has Littlefees in Boy and Girl versions (the best posers, and YoSD being the most "fun" doll size in the hobby IMHO, so portable) which can run you under $300 and they're absolutely fantastic. If you made me choose one doll to keep out of my collection... I'd hate to pick but let's be honest, it'd be Stella, my Littlefee.

They also sell Pukifees, 18cm little pocket pals in that same choice A La Carte system. Someday we hope they will bring back Pukipukis, which used to go for around $180 each and were great little travel buddies. Mine has a little case I can slip into my purse, and she's been on trips with me like a little travel gnome. 

Fairyland offers their Tan Skin kind of periodically for different size categories, so if you're really set on it, don't fret! They often offer it for Events at Winter holidays, Spring festival, or Halloween. You can buy through dealer Denver Doll Emporium if you're in the USA and don't want to deal with the company, but Fairyland has always been professional with me.

If you like fantasy fairy type dolls, Charm Doll has a cute little succulent plant fairy for $140.


If you like little animal dolls, DollFamily A makes a whole handful of little critters for $100-$120 each, and many other cute dolls besides. Cocotribe's animals are about $135.
Impldoll makes a colorful lil' crocodile at  $145 that would be easy to add horns and wings to for a dragon.

Bobobie has several beautiful tiny dolls for under $100, and you can get them through Denver Doll Emporium or the company's own website.

Doll Leaves sells a lot of lovely tiny dolls for $88!!- $135

They've also got several gorgeous Yo-SD sized (about 12 inches tall) dolls for $160.
Only Doll makes some for $110.

Dollzone has many dolls in the middle size and smaller who cost under $300, down to $175

Dikadoll mid size Kids come with lots of face types including smiling or anime style faces!

Gem of Doll has Yo-SD sized dolls and Tiny sized dolls.

Impldoll has many little fae and fairy style YoSD sized dolls at $145. Their MSDs or 1/4 sized dolls are only $188-$208. They even make 1/3 sized dolls or SD size for less than $300!

Myou Doll has some really gorgeous faces on dolls in many sizes that come in a nice price range.

Asleep Eidolon does really high quality craftsmanship on their stunning dolls, and the mid size or anything smaller are often under $300. Beautiful faces too.

Angel of Dream makes 1/4 or MSD dolls for $165, and a lot of SD or 1/3 size dolls for under $300!

Some of Doll Chateau's etherial waifs go for less than $300

If you're into Chinese fantasy and more mature dolls, Granado's 30cm lads are marvelous little versions of their well known male dolls. 

Resinsoul has so many options and almost all of them are under $300! One of my prettiest dolls is a Resinsoul hybrid. Mature 1/3 SD size men, a Tiefling looking gal you can order in many resin colors, and a lady who can be your Blood or Night Elf from WoW, with a color you choose. THey have satyrs, centaurs, draconic MSDs, and elves galore. They've even been known to swap  heads and bodies for your custom choice, or do clear resin for some parts on request.

And that's just a sampling!

Friday, August 3, 2018

I want to make Food and Props for my Doll!

Polymer clay can have a translucency to it that mimics food really well, and there are some special tricks you can do to get very realistic food. 

I'd recommend youtube Miniatures tutorials by SugarCharmShop, as she does very clear simple tutorials with great results. Her stuff is dollhouse sized but if you do the same things slightly larger you can make treats and accessories for any size of doll.

Here's a link but it autoplays a video with sound so be aware of that.

(She also repaints vinyl dolls and does doll clothing tutorials you can probably use for your BJD.)

Here's her video of polymer clay basics. Here's one for her tools she uses. 

Here's a second channel where she had a lot of the food videos and they're still there. Sound!


She's just a fantastic resource for anyone who loves dolls.

Sunday, September 3, 2017

New duds.

Shade, one of the Art Doll Crew, has finally gotten clothes to suit him. He's a bit of a clothes-horse or fashionista so he requires glamorous or interesting outfits. These were made by Nezumitoo on Etsy.


These are just phone pics, so they're not very good, but at least I now have a skylight in my hallway to add some natural light I can shoot quick snaps in.  (it used to be the shaft for a swamp cooler but I got central air so my Dad built it into a skylight for me)

Fayeth, one of my MSDs, also got into the Nezumitoo order and has appropriated this coat for herself even though it's SD sized.


Tuesday, August 22, 2017

Making Aspen the Dryad, part 2

This is a kind of post-dated post. A lot's been happening in my life and I've gone Pro as an artist so things have been rather hectic for 2017! But I did finish Aspen and she's such fun to play with!
Here's how it went.

After my thumb healed I was able to finally do her blushing. I went for a very simple and dramatic faceup, with greys and browns. He skin has been painted and blushed, with those little marks on it that birches and aspens get. I made those dimensional by using a little grainy acrylic texturing gel.


Then it was just a question of popping her wig on... and she was done! She's a ton of fun to photograph and her body takes some getting used to in the posing department but I love her expression.

I probably won't bother making clothes for her. Trees don't wear clothes! With Autumn coming up, I will need to finish her other wig- the golden Aspen in full glory!

Wednesday, April 5, 2017

Native Pair Project

Okay so I bought new dolls... but they're not for me! Not really anyway. I may end up long-term loaning them as an exhibit to our tribal culture museum.

This is a project I've meant to do for a long time but I've put off because I couldn't find anything realistic enough at a nice price and a small size. I've put down money on an AncientTales pair of male and female 1/6 scale mature dolls. I am going to modify and use them for diorama photos of my native tribe's history.

I am very excited to finally do this, later this year. I can make photos into illustrations for books if they're good enough.

Thursday, March 9, 2017

Making Aspen the Dryad, part I

So I've wanted for ages to make one of the weird super-slim alien jointed bodies sold by Doll Chateau into a Dryad. I found the perfect body for this, the K-08 male, and while it is 52cm with a head on, in scale it counts as Mini sized. She'll just be awfully tall for a 1/4 doll.


I chose the boy version of that body for this project because the girl body has huge hips and almost no ribcage ....and i know it's weird but just looking at its frail and tiny torso makes it hard for me to breathe- it's a personal anatomy nitpick/phobia/involuntary reaction I can't get around. So I bought a boy doll and will be making it into a girl who could plausibly have organs and inhale or exhale.

Then I just needed to find a head. I wanted it to be more than just another pretty face. The right face for my dryad would need to be something special, striking, otherworldly. Armeleia of Seed Doll/Seed Arts made this little bird faced head called Wol, and I knew she'd be perfect. I snagged one as soon as the order went up.

In the months before Wol arrived, I spent a lot of time working out how I would make her into a dryad. I knew I wanted a very special kind of wig, not just a green hair wig. I wanted to give her leaves, and do four or more wigs that I could change seasonally to take her outside for photoshoots. I settled on hand dyeing a LOT of fringey lace.


So much lace. So much hand dyeing. Partly I used Dye-Na-Flow by Jacquard, and partly just fabric markers for the brown twiggy bits. Each piece of lace was laid out flat, then painted and marker'ed one.
strand.
 at a time.  ....Yikes. Sometimes I wonder about myself and my idea of fun.


 Then it was time to work on the body mods. I shaved off the boy bits on the hip piece, which was easy, but the chest was a little trickier. I wanted her to have some small breasts, so I had to sculpt some in. Luckily this body has wide, low, long pecs so there's plenty of room. Here's the first few cuts with the ceramic scraper knife, and you can see my pencil guidelines. Nothing too extreme, just an A-cup size.


 Making things symmetrical before I refine the shapes. A certain amount of symmetry is desired here.


 Then a LOT of sanding! So often the key to a good mod vs a kind of shoddy one is the amount of time you're willing to put in with the sandpaper and descending fineness of grits to get a good smooth finish.
 Even at this stage she's not quite done. I hurt my thumb with an S-Hook at this point, (you do NOT want to know, it was pretty bad) so sanding had to stop while my poor digit recovered. 
Luckily Wol arrived to distract me!


 Here she is! And with her genius little s-hook holder made in the shape of a cluster of crystals! It's super sparkly in person. Armeleia hand cast it herself to include the glittery bits, so unless a bigger company wants to go to that kind of trouble they might not steal the concept. (fingers crossed. it's such a nice detail) Wol herself was in a cute little printed cloth bag I will be keeping.

I spent some time with my bandaged thumb and engaged in an evening of wigmaking. I'm pretty pleased with the results.

 Here she is, starting to come together! I am so excited! Her eyes are some I'd already owned and used on a doll I had sold on, and I was hoping they'd work for her. I love her look!


What you're seeing here on the blog is the Summer Wig, but she'll have other seasons too. From similar lace I've made her an Autumn wig in full Aspen Gold. I want to make a Spring wig with budding leaves and flowers, and a Winter wig full of ice crystals and dusted with snow.

I plan to blush her like an Aspen Tree, with lots of little black bark texture marks, and greyish brown shading and faceup.

Wednesday, February 22, 2017

Dolly GOALS for 2017

- Launch the Shop!

- Finish making Aspen, my Wol dryad on a Doll Chateau body, and Shade, my dark starry art doll.

- Do lots more photoshoots. The Shop may kind of force me to do that.

-whip up a batch of petal pink dye and finally just gradient dye the tips of most of my dolls' fingers so their darn blushing will quit just wearing off the hands.

- Finish  "Project Noggin" and get resin duplicates made. Probably by Haru Casting, they seem to be wonderful.  It's a secret, you will see... Stay tuned!

-Give Lir, Donovan and Kitso the Hob their makeovers. Kevya too. My dolls have been neglected and I want to give them better faceups and new hardcap wigs. Lir hasn't had work done since 2009!

-keep making tunics and shoes. lots and lots of shoes. Possibly dabble is a few fancy fullsets, props and furniture pieces, but the demand is for fantasy basics and shoes!

Friday, December 16, 2016

So it's been a Year

And I haven't posted much at all. This year I haven't had much time for dolls, just a few moments snagged here and there. I'm not sure what more to say than that- real life jumped up and took all my time.

I guess I can recount some of what I did manage over the course of the whole year.
 This is Chioma, my dyed Chibi Unoa. I finally dyed her, with iDye Poly and bought new PanPastels and finished her off with them. The richer colors were perfect for making her dye colors flawless. Her wig is a custom job by StellaMaris. I had made her clothes in 2015, while I was sick that Autumn.


Fayeth (Resinsoul Ju/Soom Adamelli body) is now modeling an experimental outfit I made for her last Spring, in the influence of green and growing things.
The top is just a heavy necklace made out of silver and glass beads. Now that it's cold winter, I feel like I should make her a more fitting gown for snowy weather.


 I finally made an outfit for Amadi. (Simply Divine Harlequin on a Dollstown18 body) This ombre silk has been in my fabric stash for ages, but I couldn't work out what to do with such odd colors- peach and mint?- until I matched them to this vintage scarf I've made a coat out of. Silk is so hard to work with, but the draping it gives is gorgeous. I hand-stitched it all, but it caught and snagged on every callous of my working hands. I was worried I'd ruin it.


I finished the blushing and faceup on my Withdoll Mai girl Nevae, part of the Eddion story. She's been without a faceup for far too long.

 I also made her a wig, after the one I bought for her just did not work out. This is black dyed tibetan lambswool type fiber, applied to a hardcap, pulled back in a chignon knot.


Doll stuff was planned: I am waiting on a head from Armeleia. "Wol" will be put on a slender Doll Chateau Kid body to become my long desired Aspen Dryad. I hand dyed some lace to make stuff for wigs for that doll, but I can't proceed without the head. The next step will be merely to work on the mods I want to do to the body. I can't blush it yet without the head to match it to.

I'm also making another doll I've thought a long time about, or  I will when I have time. I don't know how long I'll keep him, a few years, I guess- Some dolls are just compulsions, art I have to make, that pesters at my mind until I make them real. This one's name is Shade, and he is an IOS Anima head on a Dikadoll body. It will be dyed black.

Sunday, January 3, 2016

PSA- why you NEED a proper respirator when spraying Sealants or paints.

Dear friends, Let me show you guys why respirators are VITAL no matter what you are spraying.

I have a shop where I do my spraying work. It has a filter and a fan that sucks the air out of the spray chamber, filtering as it goes.


This is a few sprays of a paint onto some doll parts. You see that square in the wall? That is the filter. It was white when I started this. That is what was pulled out of the air while I sprayed, the can was never aimed at the filter. 

That's what ends up in your lungs when you inhale aerosols. it just shows up here because I was using a paint which has a strong color.

Please, PLEASE use a properly fitted and rated respirator. You only get one set of lungs.

Saturday, January 2, 2016

Making Solas, part 2

Part 2,
Part 1 is here.

I am making a doll of a Dragon Age character called Solas, who is a bald elf male.
I am going to make the lovely but happily inexpensive Resinsoul/Bobobie Tang into this character.

The Plan:

First, facial mods. I need Tang to resemble Solas more closely. I'll be adding or refining his elf ears, and reshaping parts of his face.

Second, Aesthetics. I want to paint and blush him to look just like the art style of the games.

Third, Outfit. I'm going to make him his basic clothing from the game art, with a few accessories.

I ended up going out of order and doing a lot of the sewing first.
Then I did a ton of sculpting. See part 1.

So as of yesterday here is what he looked like.
We went from this:

To this:

And then today I scrubbed my fingers sore doing sanding work on this sculpt and polishing up the details. More pics and updates to come!

edit: UPDATE 1/10


I am now adding paint and blushing, using images from Dragon Age Inquisition to see how the actual animated figure was "skinned" with a digitally painted texture. I can copy the shading and colors. I was able to put his little brow scar in as an actual indentation- pretty proud of that. I will be adding more color and details later today, like his lip color, freckles, eyebrows and eyelashes, and so on.

 Here he is all shirtless and scrawny but looking more himself. I wish I had better eyes for him to use but these were the only ones that fit. They are the perfect color, just not the best fit.


 He's judging me over having trouble trying to work out those stupid foot wraps of his. He couldn't just wear boots like an ordinary fantasy character, oooooh no.

Friday, December 11, 2015

About Arkady Magir


Arkady Magir
of Kiria

Company and sculpt: Fairyland MNF Mika/Mir, or Mir/ka, much modded, Tan Skin
Resin color: Fairyland Tan Skin (and paint.)
Modifications: A lot of face mods. His head was in NS but after I modded it, I also painted it to match his Tan body, using Montana Gold spraypaint in "Toffee".
Faceup: by Me
Eyes: Eyeco Chuck Hazel in 14mm
Wig: Handmade, a hardcap wig with Tibetan mohair

Name (and nicknames): Arkady Magir
Age: 32
Birthday: in Spring

Family and/or relationships:
Somewhere in Kiria, his parents and two younger sisters might still be alive. Both his parents were caught up in alcoholism and a life of petty crimes. His father had once served in their ruling Lord's levy army, but drink ruled the poor man's life after that. Arkady doesn't know much of his mother's history, remembering her as a tired, soft spoken woman worn out by a hard life. They were never cruel to him, but neither were they able to pay him much attention. Maybe in an effort to get him out of their world, his parents traded him to an army officer for a short barrel of southern wine when he was six. He was raised among warriors in the local fortress, and occasionally visited by his Uncle, a successful merchant who tried to help his family out from time to time. He's not sure if his family are still living now, but his Uncle travels so there's always a chance they might meet on the road. Arkady isn't sure what his Uncle would think of what his nephew has become.

Occupation:
He's a vagrant worker, moving from town to town looking for basic menial work. Arkady, unusually for a common freeman, has no skill at any trade. He can't ride a horse, he can't farm, he can't fish, he can't cook, he can't work a craft, mines make him claustrophobic, he can't sail a boat, and he's awkward with hand tools. People usually give him a few meals in exchange for roughly chopping wood or mucking out stock stalls.
He has three tattoos high on his left arm, the Cadre Marks of a Kiriani Dog Soldier, the private elite warriors of the ruling Lords of Kiria. Unlike the armies of farmer-soldiers levvied from a Lord's tenant population in times of frequent war, the Dog Soldiers dedicate their lives to the arts of battle. They train daily, live in their own barracks, and spend all their time with their Cadre, a score or so of other young men with whom they form a close bond. Dog Soldiers don't often grow old. These men are known all across the Northern lands for their relentless efficiency in battle. He was one of them once- and he is reluctant to talk about why he isn't one now.

 Pets:
None. He's not very good at riding horses, which belong only to nobles or warleaders in Kiria.

Personality:
Generally optimistic and cheerful, he likes to think things through before he acts on them. He's an introspective person, but he tries to live in the moment as much as he can. He's very compassionate to people around him, and will go out of his way to avoid conflicts or arguments. 

Hobbies:
He hasn't really got any... Does napping count as a hobby? He says it does.

Likes:
He loves having a warm dry place to sleep, and regular food. Like, meals more than every few days. He's a creature of very simple tastes. He loves having dry feet in comfy shoes. Anything he didn't cook is always welcome. (he can't cook.) He's actually a People Person and likes to meet or talk with people, just to be around people. He mopes if he's by himself too long, and gets restless and edgy. He likes getting a full night's sleep, which is rare for him, therefore he also likes naps. He likes dogs when they aren't chasing him, but he really loves cats. A lapful of purring cat beside the fire is his idea of a lovely time.

Dislikes: Wet feet, bad food or no food, walking in bad weather, being cold, sleeping on cold ground or wet ground, and he really hates mud. And biting flies (mosquitoes). He strongly dislikes bullies. In a feudal society there's plenty of those around. He hates it when people try to pick a fight with him. He flat-out refuses to handle any blade larger than a knife. He won't sleep in a room without two exits (window and a door). He can't sit with his back to a doorway. If someone steps in close to him suddenly he will back up or off to the side.

Other/misc: He has a habit of watching other peoples' hands- like what they're doing with them. He sleeps very, Very lightly.

Thursday, November 19, 2015

So what happened to Rosslyn this Autumn? (medical stuff)

My participation in online stuff was sparse at best,
 because again this year I got very sick.

Yeah yeah, I know. Every year. Allergies -> sinus infection ->bronchitis, -> pneumonia. Every. Year.

Warning, mild Medical talk ahead.

But this year was different because I was in so much sinus pain, and so miserable at the idea of another half-year in bed that I wheedled the doctors into doing a CT scan of my head and sinuses. Good thing too, because I had a condition called Silent Sinus Syndrome, which you can't see unless you do a CT scan.  It was probably why I have been unable to recover normally from sinus infections,  and has been an ongoing condition for years. The cure? A surgery! With multiple parts to solve all the structural problems my sinuses had!

Oh what fun. No, it really wasn't, but modern medicine is wonderful. I'll spare you the details of the surgery and recovery process, but it took a long time to progress through recovery, and I am still on Rx rinses to continue the healing, a month later.

Now what they do not tell you, when they rearrange the inside of your face in 3 different sinus procedures at once, is that bone is exhausting to heal. I'd never broken bone before, so I didn't know this. It really takes it outta you to heal any amount of work done to your bones. Also, I am recovering from over a month spent in bed. So now I am again very gradually increasing the amount of work I am able to do.

All this was very stressful for me on an Executive Functioning level too ( I am autistic, and getting complex tasks of some types done is not my best area) so I had to drop out of school for the semester, and I'll try again next semester. I am now being very, very careful about the levels of stress I subject myself to. I get swamped by stress very easily and I run out of mental energy very easily, (not just "Oooh, I'm all stressed and too tired to concentrate any more", but "ack I can't form sentences anymore or think straight and words are make thingy hand gestures someone drive me home should so home safe think yes please," so I have to take things slowly.

Wednesday, September 30, 2015

Making Solas- Dragon Age doll.

I am making a doll of a Dragon Age character called Solas, who is a bald elf male.
I am going to make the lovely but happily inexpensive Resinsoul/Bobobie (? could be either honestly I could swear I've seen him on both websites' roster- they are sister companies) Tang into this character.

The Plan:

First, facial mods. I need Tang to resemble Solas more closely. I'll be adding or refining his elf ears, and reshaping parts of his face.

Second, Aesthetics. I want to paint and blush him to look just like the art style of the games.

Third, Outfit. I'm going to make him his basic clothing from the game art, with a few accessories.

***

I ended up going out of order because I am rather ill and not recovering in anything like decent time. *grump* So lying in bed I've had a lot of time for stitching things.

So first, parts of the Outfit!


I'm gonna make a basic outfit based on images from the Dragon Age games. (I should put a pic here of the outfit. Should. Don't have a decent one that isn't someone's cosplay.)

Solas' uber-nerd turtleneck ensemble has this green dickey-collar underlayer, which no one seems to know the true identity of. I am positing it could easily be some kind of vest thing.


So I made a kind of vest thing, out of greeny brown faux leather stuff I had.

I've left the back open and pretty untailored so that when the doll arrived I could fit it to him better.

Then I worked on the cream sweater thing itself.

Here you see my messy lap-table drawing board, which I use when I craft while sitting in bed. (You'd be amazed how often I have to do that. Er, I can explain! I've been sick a lot the last few years, and have worked out this method as a survival strategy for not going stark raving bored.)


It has this collar edging which is unbelievably finicky to do at this scale.

I made the whole collar part as a separate piece that I then attached.

Again the thing is open up the back so I can adjust it to fit around the body when I have it in hand.


Ta-da!


Then guess who decided to turn up today? I had to scramble to get decently dressed enough to get to the door before the mailman could walk away thinking I wasn't home. (Oh, like you sit sick all day in bed wearing a fully presentable outfit. Don't judge me.)


The outfit needs a little work to fit him better, but not bad given that I sewed it without him present. Definitely gonna take up those sleeves for one thing.


Oh that face. Uff. Not a strong resemblance at all. The eyes will need to be smaller, the jaw longer and wider, the ears modded.


I really, really wish RS/BBB would take a hint from other doll companies and show more than one highly-obscured-by-huge-wig shot of the doll's face. I had no idea his nose would be so slim and pointy, and he has an overbite like a looming tax audit.(it hangs overhead?) Welp, that's what the Dremel is for, after all.

The plan at the moment is to modify the heck out of his head, then spray paint it white and blush it back to matching. That took me two or three days last time I did it to a doll, because first the Apoxie modding has to cure before you sand and paint, and then the paint has to cure before you seal and and blush.


 I started on his nose first.

 Then I did some work giving him a jawline and filling up those giant eyes. It always looks awful when it's this rough.


Then I started refining  the work. Filling in the eyes will be tricky. I had to stop working because I am sick and my hands shake. I'm going to try doing a little more smoothing out today.